

QuickBooks Desktop is a sophisticated business accounting suite designed for small and medium-sized enterprises, backed by years of experience in the market. Despite its reliability, QuickBooks still retains some legacy issues, one of which is QuickBooks Error 6123. This error may arise when a user attempts to open or restore a company file. The reasons for Error 6123 in QuickBooks Desktop can vary from user to user; sometimes, it occurs due to incorrect configurations, while other times, it results from file corruption. In this article, we have outlined some of the most effective techniques to fix it.
What is QuickBooks Desktop Error 6123, 0?
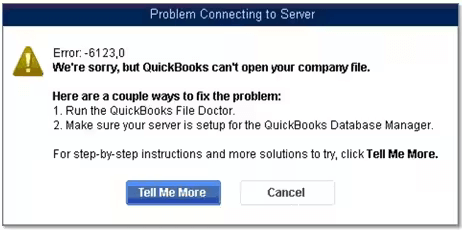
Error 6123 in QuickBooks Desktop typically displays a message stating, “Error: -6123, 0 We’re Sorry, QuickBooks can’t open the company file.” It’s common during certain actions like accessing or restoring company files, particularly over a network. The causes vary – it might be due to corrupted data within the file itself, network setup issues, firewall restrictions, or even a flawed QuickBooks installation. While tools like QuickBooks File Doctor are often the go-to solutions, sometimes the fix requires a more thorough approach, which we will explore in depth.
Symptoms of QuickBooks Error Message 6123
Navigating the realm of QuickBooks, there are times when unexpected hitches arise. One such hitch is the notorious QuickBooks Error 6123, 0. It’s essential to identify its signs early on for a swift resolution. Here’s a distilled breakdown to help you recognize if you’re encountering this error:
- Prominent Error Notifications: You might be welcomed with messages such as “Error -6123” or the more detailed “Error 6123, 0: An error occurred when QuickBooks tried to access the company file.” These notifications are clear indicators of the underlying problem.
- File Access Troubles: If you’re having a hard time unlocking or even accessing your company file, it could be due to this error. At times, the file may refuse to load, or QuickBooks may crash or freeze midway.
- Performance Lag: After successfully accessing the company file, you might find QuickBooks dragging its feet, becoming unresponsive at crucial moments.
- Data Discrepancies: A glaring sign is when your company file appears damaged or corrupted. This corruption may manifest as missing data, misaligned transactions, or even incorrect reports.
- Backup Hiccups: Challenges can arise when restoring a backup of your company file, with the process being either halted or littered with errors.
- Multi-User Mode Conundrums: Those using QuickBooks in a shared environment could face trouble. Either multiple users might find it tough to access the file simultaneously, or there could be challenges while switching to the multi-user mode.
- Sample File Issues: Interestingly, this error isn’t exclusive to your primary company file. You might also encounter it when trying to launch QuickBooks’ sample company files.
- Unanticipated Disconnections: QuickBooks could be unexpectedly booted off from the server or the network drive housing your company file.
- Update Troubles: Surprisingly, this error can also creep up when you’re simply updating QuickBooks or transitioning to a newer version.
- System Instabilities: In extreme cases, this error could send shockwaves across your software, causing QuickBooks or even your entire computer system to crash.
These signs act as sentinels, warning you of the potential issues lying beneath the surface. Recognizing them early can be the key to timely troubleshooting and continued seamless operations with QuickBooks.
Related article to read: Ideal Guide to fix QuickBooks Error 6000 77
Understanding the Causes of Message Error 6123 in QuickBooks Desktop
If you’re facing QuickBooks Error Code 6123, it’s likely due to one of several common factors. Identifying the root cause is the first step to resolving the issue. Here’s a breakdown of what might be triggering this error:
- Multiple Access Points: The error often occurs if the company file is already open on another computer, particularly in a multi-user setup.
- Ongoing Backup or Restore Operations: If you’re trying to backup or restore data when the error pops up, this process might be the cause.
- Third-Party Software Interference: Sometimes, other applications, especially antivirus programs, can interfere with QuickBooks leading to this error.
- Network or Connection Problems: Issues with your network or the connection can disrupt access to QuickBooks, triggering error 6123.
- File Location Changes: If the company file has been moved or is in an inaccessible location, might display QuickBooks error 6123, 0.
- Corrupted Company File: A damaged or corrupted company file is a common culprit behind this error.
- Outdated QuickBooks Software: Using an older version of QuickBooks that needs updating can lead to various errors, including 6123.
- Folder Permission Issues: Incorrect permissions on the folder containing the company file can prevent proper access, causing this error.
- Windows OS or Registry Issues: Sometimes, the problem might be with the Windows operating system itself or with registry errors.
Knowing these factors helps in pinpointing the exact issue, making it easier to find an effective solution for the Message Error 6123 in QuickBooks Desktop.
A step-by-step guide to fix QuickBooks Error 6123
As you now have a clear understanding of the causes and symptoms of QuickBooks Error 6123, 0, you can begin the troubleshooting process:
Procedure 1: Modifying the company file name to exclude special characters
In this troubleshooting step, we will check the name of the company file and remove any special characters if found. Below are the steps to do so:
- Close QuickBooks and make a backup of your company file.
- Locate the company file on your computer and right-click on it.
- Select “Rename” and remove any special characters such as !, @, #, $, %, ^, &, *, (, ), or spaces from the file name.
- Save the new file name and close the window.
- Open QuickBooks and click on “Open or restore an existing company”.
- Select the renamed file and click on “Open”.
- QuickBooks will prompt you to update the file name in its database. Click on “Yes”.
- Verify that the company file opens without any errors.
Renaming or removing special characters from the company file name can help resolve issues related to QuickBooks error codes such as Error 6000 77 and Error 6177.
Procedure 2: Adjusting file permissions to ensure proper access
In the second procedure, we will check the permission of the company file (.qbw). If additional permission is required, we will provide it, and the steps to escalate permission are outlined below:
Note: You have to get admin access to Windows to proceed with these steps.
- Locate the company file on your system. Generally, all your data and QuickBooks company files are saved in this location: C:\Users\Public\Public Documents\Intuit\QuickBooks\Company Files. In this folder search for the file that is ending with .qbw.
- Choose the file and then right-click on it.
- Next, click on the properties option and go to the security tab, check if there are any permissions set to this file.
- Now click on the Advanced Button after you have viewed all the permissions.
- You may now see the ‘Permission Entries’ box that shows all the permissions that are set for the users. Click on “Change Permissions”, after you saw the user whose permissions you wish to change.
- Click on the user that you want to edit, and next click on the ‘Change Permissions’.
- You will now get a pop-up box where you can actually edit the options. Click on the ‘Administrators’ user again and also click on the ‘edit’ option.
- Check if you are able to use the company file properly without any issues or not.
Procedure 3: Renaming ND and TLG files of the QBDT
Occasionally, QuickBooks Desktop users may encounter issues that prevent the software from opening or functioning correctly. A common troubleshooting step to resolve these issues involves renaming the ND and TLG files associated with your company file. This process can help fix common errors and restore connections with the company files.
Steps to Rename ND and TLG Files:
- Locate Your Company Files: Navigate to the folder where your QuickBooks company files are stored. A typical path is “C:\Users\Public\Public Documents\Intuit\QuickBooks\Company Files.“
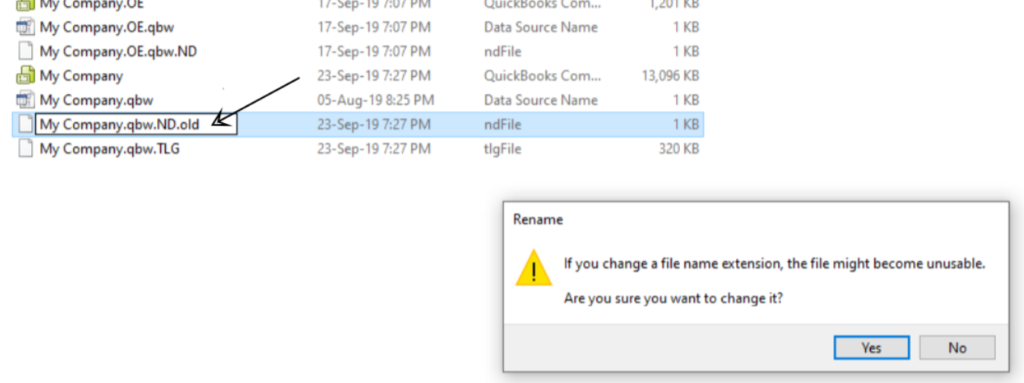
- Identify ND and TLG Files: Look for the ND and TLG files corresponding to the company file you’re experiencing issues with. These files have the same name as your company file but with the extensions .nd and .tlg.
- Rename ND File:
- Right-click on the ND file.
- Select “Rename” from the context menu.
- Change the file extension from “.nd” to “.ndold”.
- Press “Enter” to save the new name.
- Rename TLG File:
- Right-click on the TLG file.
- Select “Rename”.
- Change the file extension from “.tlg” to “.tlgold”.
- Press “Enter” to save the new name.
- Reopen QuickBooks: Close the folder and launch QuickBooks Desktop.
- Open the Renamed Company File: Open the company file for which you renamed the ND and TLG files. QuickBooks will automatically recreate new ND and TLG files with the correct naming conventions.
- Check for Resolution: Finally, verify if the issue with your QuickBooks Desktop has been resolved.
Note: Renaming these files does not cause data loss as they are automatically recreated by QuickBooks. However, it’s always good practice to back up your company files before performing such procedures, just to be on the safe side. This step is particularly helpful in resolving issues related to network and multi-user errors.
Procedure 4: Use the QuickBooks Tool Hub and fix the QuickBooks Error 6123
To resolve common QuickBooks Desktop issues, the Tool Hub can be a valuable resource. It combines several QuickBooks troubleshooting tools into one easy-to-use application. Here’s how you can download and utilize the Tool Hub:
1. Download Tool Hub
- First, close QuickBooks Desktop.
- Visit the official Intuit website or the link provided by your QuickBooks representative to download the QuickBooks Tool Hub file.
- Save the file somewhere you can easily find it, such as your desktop or downloads folder.
2. Install Tool Hub
Installing the QuickBooks Tool Hub is a straightforward process. Whether you’re technically inclined or not, the following detailed step-by-step guide will help you seamlessly install the Tool Hub:
For the Technical and Non-Technical User:
- Locate the Downloaded File: After downloading the QuickBooks Tool Hub, locate the file on your computer. It’s usually found in the ‘Downloads’ folder unless you choose a specific location. The file name will be something like
QuickBooksToolHub.exe. - Run the Installer:
- Double-click on the
QuickBooksToolHub.exefile. This action will initiate the installation process.
- If prompted, click on ‘Yes’ or ‘Run’ to allow the app to make changes to your device.
- Double-click on the
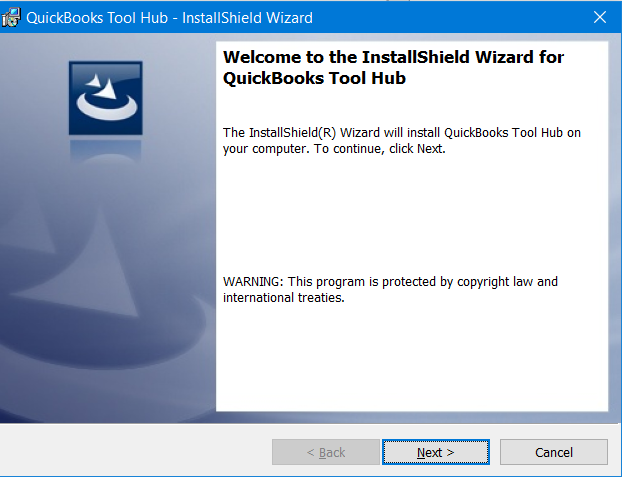
- Follow the Installation Prompts:
- The Tool Hub Setup Wizard will appear. Click on ‘Next’ to continue.
- You’ll be presented with the license agreement. Take a moment to read through it, then select ‘I accept the terms in the License Agreement’ and click ‘Next’.
- Choose the destination folder where you want the Tool Hub to be installed or simply use the default location. Click ‘Next’.
- Click ‘Install’ to begin the installation. The Tool Hub will be installed on your computer, and this might take a few moments.
- Completion: Once the installation is complete, click ‘Finish’. The Tool Hub is now installed and ready for use.
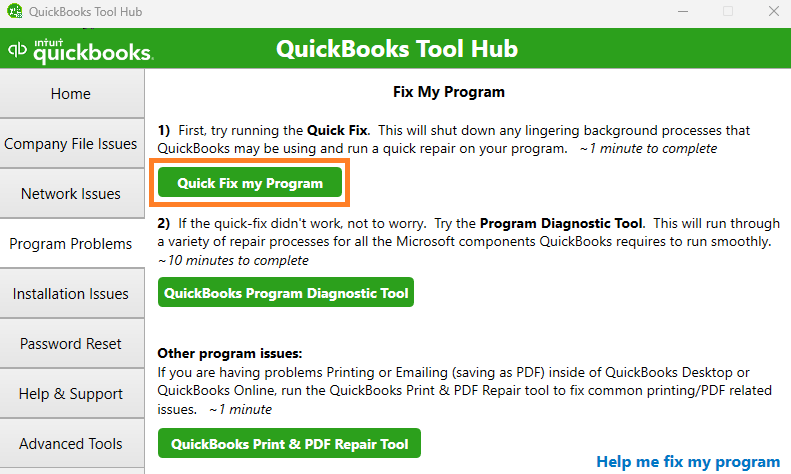
3. Run ‘Quick Fix my File’ in Tool Hub
Within the QuickBooks Tool Hub, ‘Quick Fix my File’ is a speedy repair tool designed to address and fix common file and program errors. Simply click on it, and the tool automatically performs necessary repairs without requiring you to delve into intricate details.
- Open the QuickBooks Tool Hub by double-clicking on the shortcut.
- In the Tool Hub, select the ‘Company File Issues’ tab.
- Click on the ‘Quick Fix my File’ button.
- Wait for the tool to run. It might take a few minutes. Once done, it will repair common file issues.
4. Use the QuickBooks File Doctor
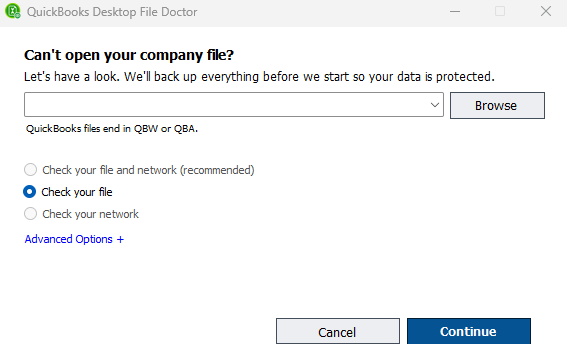
The ‘QuickBooks File Doctor‘ is a comprehensive diagnostic and repair tool available in the Tool Hub. It’s specifically designed to troubleshoot and resolve company file issues or network problems. By following its prompts, users can identify and rectify errors hindering their QuickBooks experience.
- Still, in the Tool Hub, under the ‘Company File Issues’ tab, click on the ‘QuickBooks File Doctor’ button.
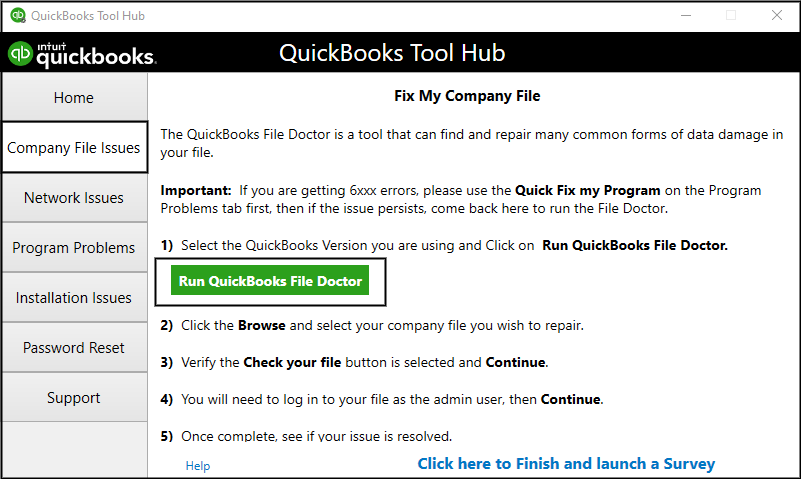
- Follow the on-screen prompts. Select your company file from the drop-down, or browse to locate it.
- Click ‘Check your file’ and then ‘Continue.’
- Enter your QuickBooks admin password when prompted, then click ‘Next.’
- The File Doctor will then start diagnosing and repairing any issues it finds. This process might take some time, depending on the size of your file and the nature of the issues.
After completing the above steps, try to open your QuickBooks Desktop and the company file to see if the issue has been resolved. If you’re still facing problems, consider reaching out to QuickBooks support or a certified QuickBooks ProAdvisor.
Procedure 5: Make a new admin user in Windows and resolve QuickBooks Error 6123
Sometimes, QuickBooks Error 6123, 0 can be triggered by a damaged Windows User Account. In such instances, creating a new admin user in Windows might help in addressing the issue.
Create a Local User Account:
- Go to Start and open Settings.
- Navigate to Accounts and select Family & other users. (In some Windows versions, you might see Other users instead.)
- Next to Add other user, click Add account.
- Choose I don’t have this person’s sign-in information.
- On the subsequent page, opt for Add a user without a Microsoft account.
- Provide a user name, password, and password hint or select security questions. Then, click Next.
Change a Local User Account to an Administrator Account:
- Open Start and head to Settings.
- Click on Accounts.
- Under Family & other users, find the account owner name (it should indicate “Local account” underneath the name), then click Change account type.
- Note: Ensure that you’re converting a “Local account”. If you see an email address or absence of “Local account” indication, you’re about to give administrator rights to a Microsoft account.
- From the Account type dropdown, choose Administrator and then press OK.
- Now, sign in with the newly created administrator account to access its privileges.
Caution: Administrators possess extensive rights. They can access anything on the system. Additionally, any malware they come across can exploit these rights, potentially damaging system files. Grant this access level judiciously and only to those you trust.
Remember, setting and safeguarding a strong password is crucial. If you lose or forget the password, it can’t be recovered as it’s not known to Microsoft.
Procedure 6: Update QBDT to the latest version using 4 simple steps
Error 6123 in QuickBooks Desktop can sometimes be fixed by ensuring you’re using the latest version of the software. Here’s how to update QuickBooks Desktop:
Update QuickBooks Desktop:
- Launch QuickBooks Desktop.
- Go to the Help menu located at the top and select Update QuickBooks Desktop.
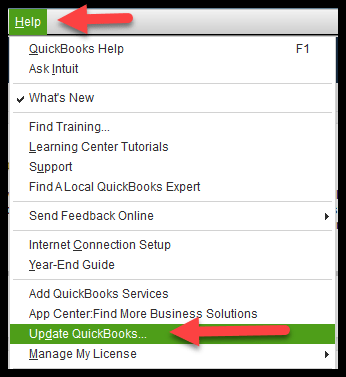
- In the Update QuickBooks window, click on the Update Now tab. Before clicking on Get Updates, you might want to empty the checkbox next to Reset Update to clear all previous update downloads.
- Click on Get Updates to start the download.

- Once the update is complete, restart QuickBooks. Upon reopening, you’ll be prompted to install the update. Click Yes.
If Error 6123 Persists, Reset the QuickBooks Update:
- Launch QuickBooks Desktop.
- Navigate to the Help menu and select Update QuickBooks Desktop.
- In the Update QuickBooks window, click on the Update Now tab.
- Check the Reset Update box to clear all previous update downloads.
- Click on Get Updates.
- Once the update is downloaded, close and reopen QuickBooks Desktop. You’ll be prompted to install the update. Ensure you click Yes.
Try to Open the Company File:
- After successfully updating (or resetting and updating) QuickBooks Desktop, attempt to open your company file.
If after following these steps the error still persists, it may be a good idea to consider following troubleshooting steps or contacting QB Data Recovery Services Team for further assistance.
Methods to fix QuickBooks Error 6123 on Mac
Method 1: Change the Company File Location
- Create a new folder on your Mac’s desktop or any other preferred location.
- Navigate to the current location of the company file causing the error.
- Locate the company file with the .QBW file extension and copy it.
- Paste the copied file into the newly created folder.
- Open QuickBooks, click on “Open or Restore a Company,” and select “Open a Company File.”
- Browse to the new folder where you pasted the company file and open it.
- Check if the QuickBooks Error 6123 is resolved. If it is, you can continue working with the file in the new location.
Method 2: Temporarily Disable Antivirus/Firewall Software
- Open the antivirus/firewall software installed on your Mac.
- Temporarily disable or turn off the antivirus and firewall protection.
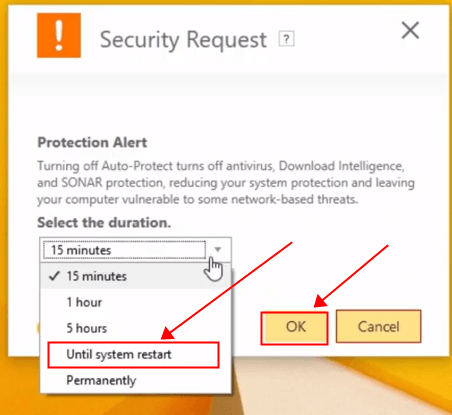
- Launch QuickBooks and try opening the company file to check if the error persists.
- If the QuickBooks Error 6123 no longer occurs, adjust the antivirus/firewall settings to allow QuickBooks access to the company file.
- Enable the antivirus/firewall protection once the issue is resolved.
Method 3: Restore a Backup of the Company File
- Locate a recent backup of the company file (with the .QBB file extension) saved on your Mac or external storage.
- Open QuickBooks and click on “Open or Restore a Company.”
- Select “Restore a Backup Copy” and click “Next.”
- Choose “Local Backup” and click “Next” again.
- Browse to the location of the backup file and select it.
- Follow the on-screen instructions to complete the restoration process.
- After the restoration, try opening the restored company file to check if the QuickBooks Error 6123 is fixed.
Method 4: Use the QuickBooks Refresher Tool and remove QuickBooks Error 6123
- Download and install the QuickBooks Refresher Tool from the official Intuit website.
- Launch the Refresher Tool and let it scan your QuickBooks installation.
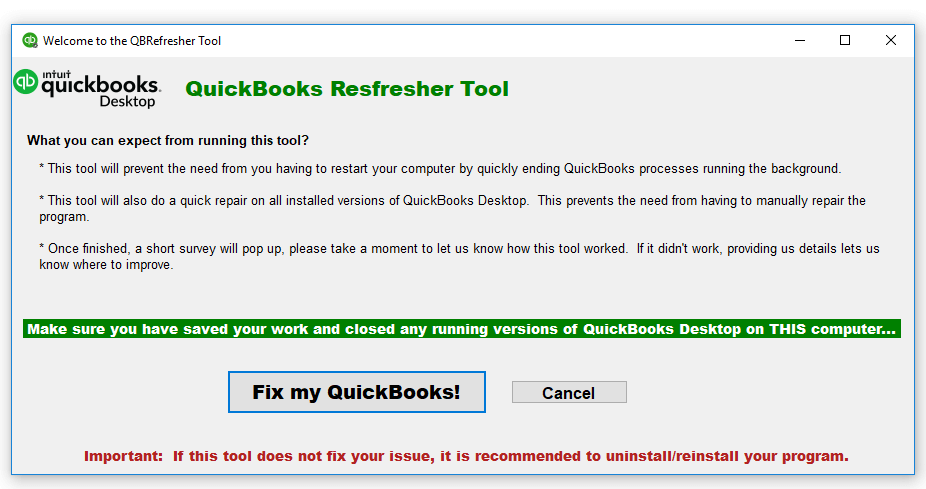
- Once the scan completes, the tool will automatically refresh your QuickBooks components.
- After the refresh process finishes, restart your Mac and try opening the company file again.
Method 5: Run the QuickBooks File Doctor and fix QuickBooks Error 6123
- Download and install the QuickBooks File Doctor from the official Intuit website.
- Launch the File Doctor application and choose the “Company File” option.
- Browse and select the company file causing the error (with the .QBW file extension).
- Click on “Continue” to initiate the scanning process.
- Follow the on-screen instructions provided by the File Doctor to repair any identified issues.
- After the repair process completes, close the File Doctor and attempt to open the company file again.
Method 6: Update QuickBooks to the Latest Version
- Launch QuickBooks on your Mac.
- Navigate to the “QuickBooks” menu and click on “Check for QuickBooks Updates.”
- If an update is available, follow the on-screen instructions to download and install the latest version.
- Restart your Mac and try opening the company file again to check if the QuickBooks Error 6123 is resolved.
Ending the Guide…
If you’re having trouble opening your QuickBooks company file and keep encountering the dreaded QuickBooks Error 6123, 0, don’t worry. It can be frustrating, but there are steps you can take to fix the problem. This article has outlined some detailed troubleshooting tips, including checking your network connection and renaming the company file. By following these steps, you should be able to get back into your QuickBooks file and manage your finances with ease. And if you need extra help, don’t hesitate to contact QB Data services.
Frequently Asked Questions
I encountered a “QuickBooks can’t open your company file” alert. What does this signify?
This message often hints at the Error 6123, 0. It means that QuickBooks is facing issues accessing your company file due to various potential reasons.
While restoring my QuickBooks backup, I faced the “Error 6123 0 restoring QuickBooks backup”. What should I do?
This error during restoration suggests potential file corruption or network disruption. Make sure your backup isn’t corrupted and try restoring again.
Where can I get help with QuickBooks Error 6123?
You can reach out to QuickBooks’ Data Service Team channels, user forums, or consult with tech experts familiar with QuickBooks issues.
