
Experiencing a QuickBooks Desktop Update Error can disrupt your workflow, especially when it strikes unexpectedly during other tasks. Such update errors can prevent QuickBooks Desktop from downloading or installing critical updates, negatively impacting essential features like payroll. These updates not only correct bugs and enhance security but also add valuable new features to help optimize your financial management. Regular updates from Intuit are designed to keep QuickBooks running smoothly. If you face issues like QuickBooks taking too long to update, find yourself stuck on the updating screen, or discover that QuickBooks won’t open, don’t worry. The following sections will delve into the causes of these update errors and provide detailed troubleshooting steps to help you resolve them efficiently.
Still struggling with a QuickBooks update that won’t complete? If you’ve tried all the suggested fixes and nothing works, don’t worry! Call the Data Service Solutions Team at 1-888-538-1314 for immediate assistance and get your updates back on track fast!
What is QuickBooks update error writing system registry values
QuickBooks update stuck on writing system registry values occurs when the software struggles with the update process, preventing the installation of the latest features or patches. This issue often stems from internet connectivity problems or conflicts with background applications, leading to problems such as QuickBooks update taking too long or QuickBooks stuck updating. Resolving This error QuickBooks update writing system registry values is crucial for the reliability and security of your accounting software. By ensuring a stable internet connection and reducing background activity during updates, users can typically overcome these issues and successfully update QuickBooks.
Causes For Update Error in QuickBooks
Due to the variety of update error codes such as 1603, 1712, 1722, 404, PS038, PS036, and others, we have chosen to focus on common reasons for these errors rather than addressing specific error codes individually.
- Unstable Internet may cause QuickBooks update taking too long.
- You’re using an outdated QuickBooks Desktop 2019 or older version, which is now unsupported versions.
- Insufficient storage space on the device to download updates may trigger QuickBooks stuck updating.
- Firewall settings aren’t configured to allow QuickBooks Desktop to download the updated file.
- Due to Lack of administrative rights a QB user may experienced QuickBooks won’t update.
- A Damaged Data file is likely to cause Error PS038 in QuickBooks 2023.
- Incorrect Date or Time can also create circumstances to get confront QuickBooks update not working problem.
Read more: Unable to install QuickBooks Desktop Error 1712

Tested Methods to fix QuickBooks Won’t Update Issue
With a solid understanding of why QuickBooks won’t update or gets stuck, we can now proceed to the solutions. These steps are specifically designed to handle the different challenges you may experience with QuickBooks updates. With these targeted methods, you can tackle and resolve the challenges preventing successful QuickBooks updates.
#1: Use the QuickBooks File Doctor Tool
The QuickBooks File Doctor tool is a built-in feature offered by Intuit that can help diagnose and repair various network and company file-related issues, particularly useful for addressing QuickBooks Update Error. Let me show you how to operate this effective tool:
Step 1: Download and Install QuickBooks File Doctor
If you don’t have QuickBooks File Doctor installed on your computer:
- Visit the official QuickBooks website and download the QuickBooks Tool Hub
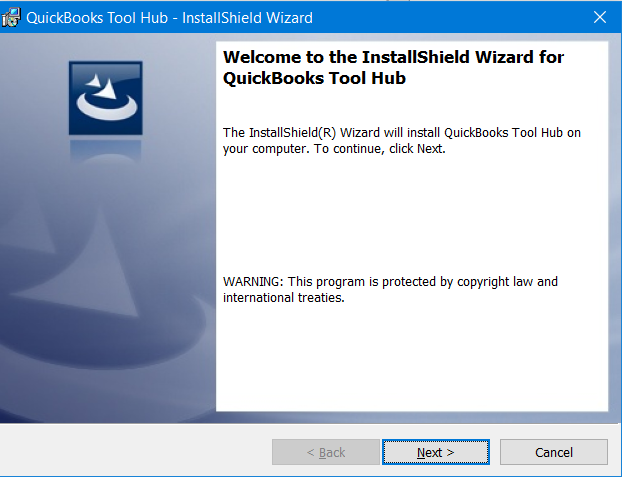
- Once downloaded, double-click on the QuickBooksToolHub.exe file to begin the installation process
- Follow the on-screen prompts and accept the terms and conditions to install the tool.
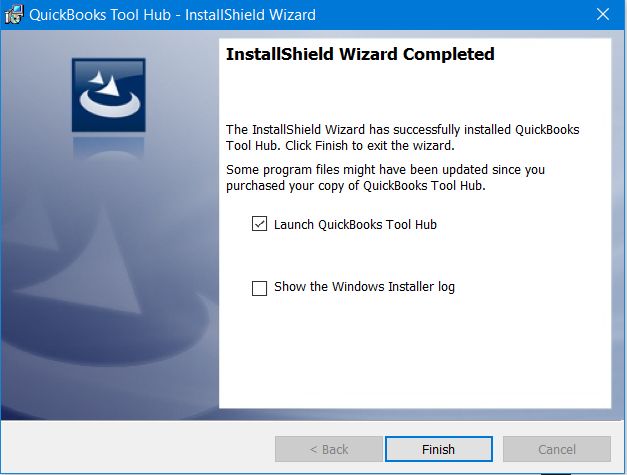
- Once installed, you will see an icon on your desktop. Double-click on it to open the tool.
Step 2: Run QuickBooks File Doctor
- Inside the QuickBooks Tool Hub, select the ‘Company File Issues’ tab.
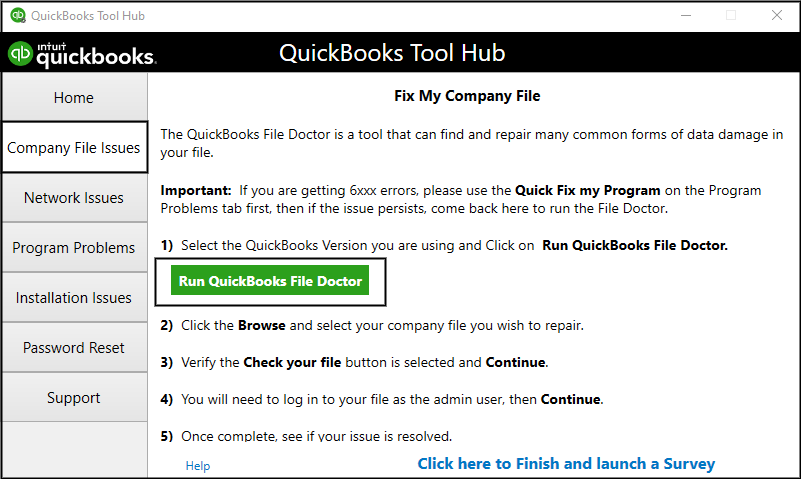
- Click on the “Run QuickBooks File Doctor” button. This will open the File Doctor tool.
- In the tool, click on the ‘Browse’ button and locate your company file (.QBW) that may be contributing to the update error.
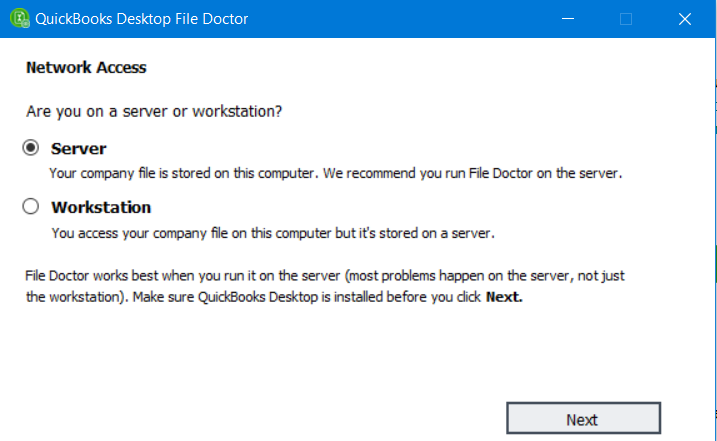
- Once selected, you will have two options for checking your file: ‘Check your file’ and ‘Check your file and network’. Choose the appropriate option based on your situation.
- Click on ‘Continue’ and enter your Admin password when prompted.
- Click on ‘Next’, and the File Doctor will begin the scan and repair process. This may take some time depending on the size of your file and the nature of the issues.
This approach avoids specific error codes and focuses on general steps for using the QuickBooks File Doctor to resolve update-related issues
#2: Configure network adapter settings to mend QuickBooks update issue
- Press the Windows icon and then type settings in the search area.
- Now select the “Network and Internet”, next click on status.
- From the many visible options you can see the blue colored “network reset” option. Click on that.
- Click on the “reset now” button if you like to reset the network adapter. Note: This will reset your network components and you have to re-install the other networking software later.
- You have to end these steps by rebooting your PC and again launching QuickBooks, checking if it is updating or not.
#3: Check the date and time on your computer
Incorrect date and time very likely to cause QuickBooks Update Error. Follow the subsequent steps to correct date and time in your system.
- You can see the clock and date section at the bottom right corner of the windows, just click on that to open it.
- Adjust the date and time by selecting the date and time option, write current date and time.
- At last, hit on OK twice.
- Next open the QuickBooks program again and then check if the application is able to update or not.
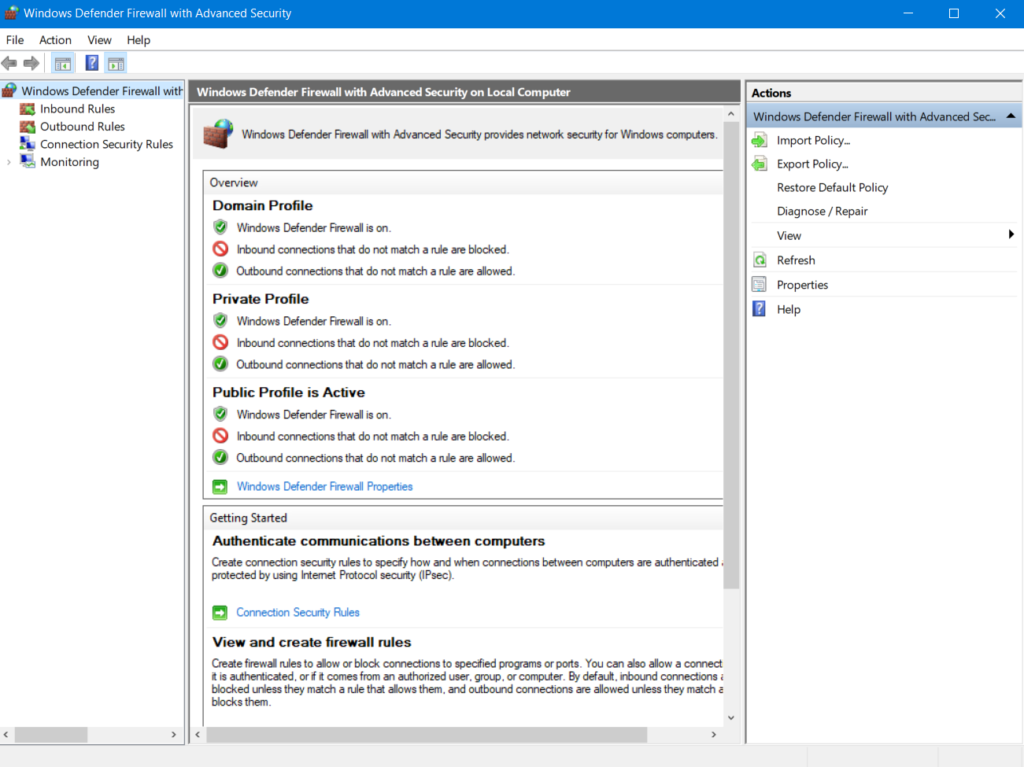
#4: Configure internet and firewall settings to fix QuickBooks Desktop Update Error
- First, click on the start tab and then search for the QuickBooks Database Server Manager inside the search bar.
- When you see the QuickBooks Database Server Manager from the list of the installed app, click on it and then choose the port monitor tab.
- Next, at some place note down the port number of the version of the QB program.
- Now again go to the start menu and search for the windows firewall.
- Open the firewall of the windows and next click on the advanced settings option.
- Right-click on the Inbound rules and then choose the new rule.
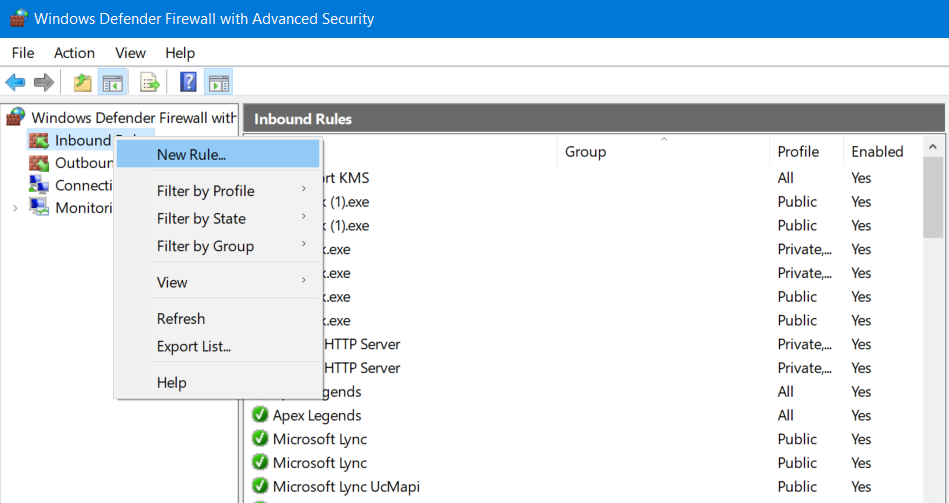
- Now smash the click button on the port option and click on next tab. (Also enable the TCP option)
- Once you have completed check the specific local ports and now enter the port number.
- Now, click on next and select the option “Allow the connection”.
- Click on the next button once again and name the new rule.
- Now follow these same steps for the outbound rules and finish the process.
#5: Access QB desktop as an admin and eliminate QuickBooks Update Error
- Exit from the QB application.
- Now find the QuickBooks program that you have installed earlier on your PC and right-click on it to open up the menu.
- Next, select the “Run as Administrator” option from the menu and QuickBooks will now run on the admin mode.
- Try to update the QuickBooks, if you still can’t do it then follow the next set of troubleshooting.
#6: Download updates in the safe mode
- To access the safe mode in windows, restart your PC and then hit the boot key again and again till you see the Advanced Boot Options.
- Choose the option Safe mode with networking and press the Enter key.
- Now download the update for your QuickBooks and then restart the PC in normal mode and check if the program is working fine or not.
Note: In Some scenarios users won’t be able to restore from safe mode, So perform the above mention steps at your own risk.
#7: Remove other versions of the QuickBooks
For Mac
- First close the QuickBooks, use finder menu from the mac desktop.
- Choose go and pick the duplicate or other QB versions, click on the QuickBooks for mac icon and drag it to the trash.
For Windows
- Choose the control panel from the windows start menu.
- Next, uninstall the QuickBooks by selecting the “uninstall a program” and then choose the QuickBooks from the visible list of applications.
- Click on the uninstall to remove QuickBooks from your PC completely.
- Download and install the QB clean install utility from the intuit’s official website.
- Launch it and select your QuickBooks version, next click on OK to completely remove the QuickBooks and its residual registries.
#8: Enable third-party updates in Windows and MAC
Windows
Prerequisites
- sufficient disk space to store the source binary content for third-party software updates in the WSUSContent directory of the top-level software update point.
- The quantity of storage needed varies depending on the vendor, the kinds of updates, and the particular updates you publish for deployment.
- If a drive with extra free space is needed, you can transfer the WSUSContent directory there.
- Internet access is necessary for the third-party software update synchronization service.
- Microsoft’s download.microsoft.com over HTTPS port 443 is required for the partner catalogs list.
- access to updated content files and any third-party catalogues over the internet. Other than port 443, other ports might be required.
- The SUP uses the same proxy settings as third-party updates.
Enable third-party application updates (QuickBooks)
You can subscribe to outside update catalogues in the Configuration Manager console if you enable this option. After that, you can deploy those updates to customers by publishing them to WSUS. To enable and configure the feature for use, the following actions should be carried out once for each hierarchy. If you ever change the WSUS server for the top-level SUP, the processes might need to be repeated.
- Navigate to the Administration workspace in the Configuration Manager console. the Sites node by expanding Site Configuration and choosing it.
- Choose the site that is at the top of the hierarchy. Choose Configure Site Components from the ribbon, then choose Software Update Point.
- The Third-Party Updates tab should be selected. Choose the option to allow updates from third parties.
Mac
Some applications cannot be installed because they are not Apple-signed. Follow these instructions to allow third-party apps to install if you are confident in the application and are certain you want to install it.
- Clicking the Apple symbol and selecting “System Preferences” will bring up the window.
- The “System Preferences” window’s “Security & Privacy” tab should be selected.
- To authorize changes, pick the “General” tab and then the lock in the bottom left corner.
- Select “Unlock” after entering your computer’s username and password.
- Snap the window shut. Now, you can set up trusted unsigned programs.
- You may wish to go through the process again and tick “Mac App Store” on step five to turn this function back off for security concerns.
#9: Free up some space then update QuickBooks
If you can’t update your QuickBooks then there is a possibility that your drive needs more space and your hard disk is 90% full. It is advised not to install unnecessary applications into your C Drive as this is the primary disk used for running the OS and also contains important files. Make some room for the updates and again try to update the QuickBooks.
#10: Re-install the QuickBooks and resolve QuickBooks Dekstop Update Error
- Uninstall the QuickBooks from your system.
- Now click on the file explorer icon to open it from the system tray.
- From the top pane click on the view tab and then select hidden items.
- Next, locate the folder that has your QuickBooks company files. Generally, you have to find the QuickBooks folder. You can find the company files in the following locations:
- C:\ProgramData\Intuit\QuickBooks (year)
- C:\Users(current user)\AppData\Local\Intuit\QuickBooks (year)
- C:\Program Files\Intuit\QuickBooks (year)
- 64-bit version C:\Program Files (x86)\Intuit\QuickBooks (year)
- Now right-click on the folder and select to rename it.
- You have to add the word ‘old’ at the end of the folder name to block QuickBooks from opening it when you re-install the software.
- Re-install the QBDT now and check if you are able to use the application or not.
#11: Update the Windows OS from 32-bit to 64-bit
Note: Do not proceed with this step if you are using a 32-bit system architecture. Also, take a complete backup of the company files and the crucial data because it is a clean install process and will delete all your data stored on the drive.
Check if you are using a 32-bit system architecture or 64-bit
- Hit the window button from your keyboard and type the settings in the search bar.
- Now navigate to the System >> About and under the ‘Device specifications’ check the system type.
- You may see the following things: 64-bit operating system, x64-based processor or 32-bit operating system, x64-based processor or 32-bit operating system or 64-bit operating system.
After you have successfully identified the type of the OS you are using and the System, it is time to update your Operating system from 32-bit to 64-bit.
- Go to MS’s official website and from there download the MediaCreationTool.exe.
- Plug a PD or Flash drive greater than 8 GB.
- Run this tool, click on ‘Accept’ if you agree with the license terms, now select ‘Create installation media for another PC’, and click next.
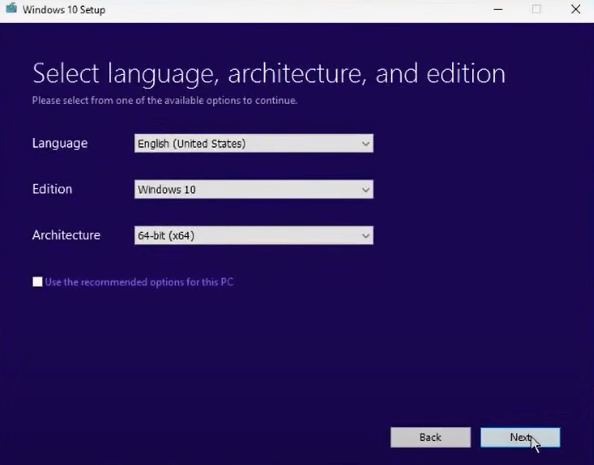
- Uncheck the ‘Use the recommended options for this PC’ and change the Architecture to 64-bit. Click on next.
- Now choose which media you want to use, select ‘USB flash drive’ and click on next.
- Make sure the USB you are using is completely formatted. Select the drive and click on next.
- This will prepare your PD to be used to install the windows. You shall see the following message ‘Your USB flash drive is ready’, click on finish and remove your PD.
- Reconnect your PD and restart your computer. Visit your BIOS menu, next go to Advanced BIOS Features, and make your First Boot Device your PD.

- Save the settings and next under the windows setup follow the on-screen instructions to successfully install the 64-bit windows OS.
- Re-install QuickBooks and check if you are getting any issues or not.
Coming to an end
resolving QuickBooks Update Errors is crucial for ensuring your software runs smoothly with the latest features and security updates. If you continue to experience difficulties with updates after trying the recommended solutions, or if you need further guidance, don’t hesitate to reach out to Data Service Support. Our expert team is ready to provide personalized assistance and quickly resolve your update issues. For specialized support, contact us at our toll helpline number. We are committed to making your QuickBooks experience seamless and efficient.
What to do when the QuickBooks update reboot loop occurs?
If you’re experiencing a reboot loop when updating QuickBooks:
1. Restart your computer in Safe Mode.
2. Once in Safe Mode, open QuickBooks and disable automatic updates.
3. Restart your computer normally.
4. Manually update QuickBooks to the latest release.
I’ve encountered an issue where my QuickBooks update gets stuck on writing system registry values. How can I resolve this?
Experiencing the “QuickBooks update stuck on writing system registry values” can be due to system permissions or conflicts with other software. Here’s what you can do:
1. Make sure you’re logged in as an Administrator.
2. Temporarily turn off antivirus and firewall programs, then attempt the update. Don’t forget to turn them back on afterward.
3. If the problem remains, you might want to utilize the QuickBooks Install Diagnostic Tool to address common installation issues.
Why my QuickBooks won’t update even though my internet connection is stable?
If QuickBooks won’t update despite a stable internet connection, ensure that your firewall settings are not blocking QuickBooks. You may also need to verify that the date and time settings on your computer are correct, as incorrect settings can prevent updates.
Can incorrect computer settings cause QuickBooks Update Error?
Yes, incorrect system settings such as the date and time can lead to update issues. Ensure these settings are accurate on your PC.
What is the process for updating QuickBooks if I’m running it as an administrator?
Right-click the QuickBooks icon and select “Run as Administrator.” This gives QuickBooks the necessary permissions to perform updates and may resolve update-related issues.
What can I do if the QuickBooks update installation freezes or crashes?
If the update installation process freezes or crashes, restart your computer and try installing the update in Safe Mode. This can help bypass conflicts with other software.
What should I do if QuickBooks fails to reset an update?
If QuickBooks fails to reset an update, first try restarting the program and running it as an administrator. If the issue persists, check your internet connection, disable antivirus software temporarily, and clear the update download folder. For further assistance, contact QuickBooks technical support.
What does mean qb enterprise stalling on update writing registry values
QuickBooks update stuck on “writing system registry values” indicates that QuickBooks is encountering issues while applying updated patches. Hopefully, you have tried the solutions mentioned above. If the issue persists, you can reach out to Intuit’s official support or contact us, an independent third-party service provider, for assistance.

I’m experiencing an issue on two servers (both running Windows Server 2022), where the update process gets stuck at “Writing System Registry Values” and stalls at 28%. One server is using Enterprise 24.0, while the other is on Pro Plus 2024. Despite the different setups, both are encountering the same problem when applying the latest patch.
After some time, the update does eventually complete, but it takes nearly two hours per server. I’ve updated six other servers with this patch, and they’ve all taken a similarly long time to finish.
Update: Thanks to some helpful advice, it seems the delay is caused by Windows Defender blocking the update process. Temporarily disabling real-time protection (via Windows Security > Virus & Threat Protection > Manage Settings > Real-Time Protection) allows the update to proceed at a normal speed. Just make sure to re-enable it once the update is done!
I truly appreciate the support and feedback—thank you all for your help!
Try disabling Windows Defender Antivirus. Once it’s turned off, the update should complete successfully. Don’t forget to re-enable Defender afterward. Hope this helps!
QuickBooks Desktop Update Freezing on Writing System Registry Values
We encountered repeated failures while installing the QuickBooks Desktop update on Windows 11. The installation would freeze on the “Writing system registry values” pop-up.
After multiple attempts to cancel and restart the update, we discovered that temporarily disabling Windows Defender resolved the issue.
Hi Paul-EX,
If you’re experiencing the issue where the QuickBooks Desktop update freezes, a possible solution is to temporarily disable Windows Defender. You can do this by opening Windows Security, navigating to Virus & Threat Protection, and turning off real-time protection. Once disabled, try running the update again. Don’t forget to re-enable Windows Defender afterward to keep your system secure. Let me know if you need any further assistance!
I’m in the middle of updating QuickBooks, and it’s been stuck for over 30 minutes on the “removing applications” screen. No error message — just frozen.
Has anyone faced this before? It’s the first time I’ve seen QuickBooks update stuck on removing applications, and I have no idea what’s causing it. Tried restarting once, but it went right back to the same screen.
Any advice or steps to fix this? I have client work piling up and really need this resolved fast.
Thanks in advance!