
QuickBooks is known for its strong accounting features, helping professionals manage their finances easily with many useful tools. But even with its success and advanced technology, sometimes users run into problems that can be frustrating. One common problem is when “QuickBooks Migration Failed Unexpectedly” – this error can pop up when you’re trying to move files from one place to another.
In this guide, we’ll go over what causes this problem and give you different ways to fix it. We’ll also look at the QuickBooks Migrator Tool, which can be a big help when you’re stuck with this issue. If you’re dealing with the “QuickBooks Migration Failed Unexpectedly Windows 11” error, this guide has the tips and tricks you need to get your important company data back quickly and without hassle.
What is QuickBooks Migration Tool – An Overview
QuickBooks Desktop 2019 brought us the QuickBooks Migration Tool, often just called the “Migrator Tool.” This tool is a big step forward in making things easier for users. It lets you move the QuickBooks Desktop Pro application and your three most recent company files to a new computer easily. The creation of this tool shows Intuit’s dedication to making data transfer straightforward, so you can upgrade your computer without the stress of moving data manually.
Prerequisites or Minimum System Requirements
If you don’t meet the minimum system requirements for the QuickBooks Migration Tool, you might encounter the notorious “QuickBooks Migration Failed Unexpectedly” error. It’s crucial to ensure your system meets these minimum requirements before proceeding.
- QuickBooks Version: The tool is available from QuickBooks Desktop Pro 2019 onwards.
- User Privileges: To use the Migrator Tool, you must be logged in as an admin user.
- Internet Connection: The computer receiving QuickBooks Desktop Pro must have an active internet connection.
- USB Flash Drive: A flash drive with sufficient storage space to transfer the required QuickBooks files. The Migrator Tool provides guidance on the exact storage space needed during the migration process.
Note: If you face the “QuickBooks Migration Failed Unexpectedly” issue more than twice, refrain from trying again. Instead, seek assistance from the QB Data Service Team at our toll free helpline number. Repeated attempts might risk damaging the data in your company file.
Limitations of the QuickBooks Migration Tool
While the QuickBooks Migration Tool is quite helpful, it does have some limitations you should be aware of. It’s designed to streamline the migration process, but there are some things it doesn’t do, that means you might need to do a bit extra to ensure a complete setup on your new computer.
- Selective File Transfer: The tool transfers only the three most recently opened company files. Older company files or backup information are not transferred.
- Incomplete Setup Transfers: The Migrator Tool does not carry over multi-user setup information, payroll and payment setup details, or Intuit Data Protect information. These configurations must be manually set up on the new computer.
- Manual Reference: Though the tool doesn’t copy certain information to the new computer, all data remains on the original machine. Users can refer back to it if necessary.

Download and use QuickBooks migration tool
Here are the steps to download and use the QuickBooks Migration Tool:
- Go to the QuickBooks website and log in to your account.
- Download the QuickBooks Migration Tool by clicking the “Download” button.
- Save the installation file to your computer and then run it to install the tool.
- Launch the QuickBooks Migration Tool from your computer’s Start menu or desktop shortcut.
- Follow the on-screen instructions to transfer your data from one QuickBooks company file to another. This may involve selecting the source file, and the destination file, and mapping the data fields.
- Once the migration process is complete, the tool will provide a report indicating the success or failure of the migration.
- Verify the accuracy of the transferred data and make any necessary adjustments.
Note: It is recommended to create a backup of your QuickBooks company file before starting the migration process to ensure that your data is protected in case of any errors or issues.
What should you do if “QuickBooks Migration Failed Unexpectedly” or the tool doesn’t work?
The QuickBooks migration tool assists both Windows and Mac users in migrating their company files or data seamlessly from one system to another. However, if it fails or the move.quickbooks.bat file becomes corrupted, the tool won’t be able to proceed with subsequent operations. In such cases, users might encounter the error message “QuickBooks Migration Failed Unexpectedly on Windows 11.”
If the QuickBooks Migration Tool fails or doesn’t function properly, consider the following troubleshooting steps to resolve the issue:
- Check for compatibility: Ensure that both the source and destination QuickBooks files are compatible with the Migration Tool. If the files are not in the correct format or version, the tool might not function properly.
- Check the data size: The migration might fail if the data file size is excessively large. Consider breaking the data into smaller chunks and migrating them individually.
- Check the internet connection: A slow or inconsistent internet connection can trigger the “QuickBooks Migration Failed Unexpectedly” error. Ensure a stable internet connection before initiating the migration process.
- Reinstall the Migration Tool: If software-related issues persist, try uninstalling and then reinstalling the Migration Tool.
- Use an alternative method: If the Migration Tool continues to fail, consider manually migrating the data by exporting it from the source file and importing it into the destination file.
Follow these steps to manually migrate your QuickBooks company data from one system to another:
- Backup the source company file: Make a backup copy of your source company file to ensure that you have a copy of your data in case anything goes wrong during the migration process.
- Export the source data: In QuickBooks, go to “File” > “Utilities” > “Export”. Select “Export” and then choose the “IIF (Intuit Interchange Format)” option. Save the exported file to your computer.
- Install QuickBooks on the destination system: If QuickBooks is not already installed on the destination system, download and install the appropriate version of QuickBooks.
- Import the exported data: In QuickBooks on the destination system, go to “File” > “Utilities” > “Import”. Select “Import” and then choose the “IIF (Intuit Interchange Format)” option. Locate and select the exported file that you saved in step 2.
- Map the data fields: During the import process, you will be prompted to map the data fields from the exported file to the appropriate fields in QuickBooks. Be sure to match each field correctly to ensure that your data is imported accurately.
- Verify the imported data: After the import process is complete, review the data in QuickBooks to ensure that all of your data has been imported accurately.
Note: The manual migration process may take longer than using the QuickBooks Migration Tool, and there is a higher risk of data loss or errors. It is recommended to follow the steps carefully and to reach out to QuickBooks support for assistance if needed.
What Steps Should You Take if Both the Migrator Tool and Manual Method Fail?
If you find yourself facing continued challenges even after employing both the migrator tool and manual methods, your initial step should be to identify the root causes of the issue. Once pinpointed, you can methodically work through each troubleshooting technique to determine the most effective resolution.
For a detailed breakdown of the primary causes and a variety of potential solutions, continue reading the subsequent sections of this blog. Our aim is to arm you with the knowledge and tools needed to successfully resolve the “QuickBooks Migration Failed Unexpectedly” error on Windows 10.
Unraveling the Mystery – Why Does “QuickBooks Migration Fail Unexpectedly” on Windows 11?
Encountering the “QuickBooks Migration Tool Not Working” error can be a perplexing hurdle. To demystify this, we delve into the most common culprits that might be causing this snag:
- Incompatibility with the Operating System: The crux of the problem often lies in an operating system that’s either not up-to-date or incompatible with your version of QuickBooks Desktop (QBD). Ensuring harmony between your OS and QBD version is key.
- Corrupted System Files: At times, the smooth functionality of QBD is thwarted by corrupted files lurking within your operating system. These hidden gremlins can wreak havoc on your migration process.
- Damaged Migration Service Files: Essential files crucial for the migration process may have been corrupted or unintentionally deleted. These files are the unsung heroes of a successful migration, and their integrity is paramount.
- Restrictive Permissions for QuickBooks Folder: Sometimes, the obstacle is inadequate permissions set for the QuickBooks folder on your host or server computer. This can act as an unintentional gatekeeper, blocking the migration path.
- Outdated or Faulty QuickBooks Database Server Manager: An often-overlooked factor is a malfunctioning or outdated QuickBooks Database Server Manager. Keeping this tool in prime condition is essential for seamless migration.
- Interference from Third-Party Software: External software, especially security programs or firewalls, might be overly protective, inadvertently obstructing QuickBooks processes. Adjusting these settings might be the key to resolving the issue.
Understanding the root cause is the first step in troubleshooting this error. Once identified, the path to a solution becomes clearer and more navigable.
Quick solutions to fix QuickBooks Migration failed Unexpectedly in Windows
The “QuickBooks Migration Failed Unexpectedly” error is more commonly encountered in Windows 10 and 11 than in any other operating system. As a result, we’ve compiled a list of some of the most effective solutions to address the “QuickBooks Migration Tool Not Working” or migration failure issue. However, it’s crucial to follow the steps in the order we’ve provided for the best results.
Solution 1: Restore to an old version of the windows (previous in this case)
Solution 1: Revert to a Previous Version of Windows
If you’re facing issues, sometimes rolling back to an earlier version of Windows can help. Here’s how you can do it:
- Click on the Windows icon, then select ‘Settings‘.

- Once inside Settings, find and click on ‘Update & Security‘.
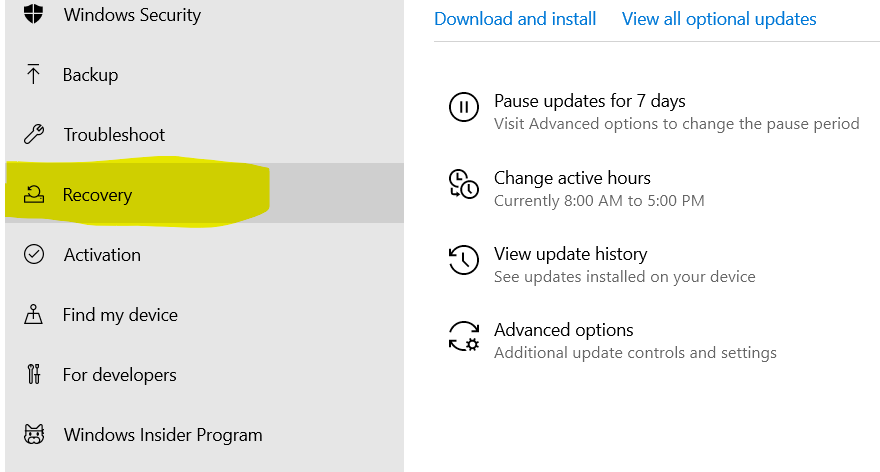
- In the sidebar on the left, click on the ‘Recovery‘ tab.
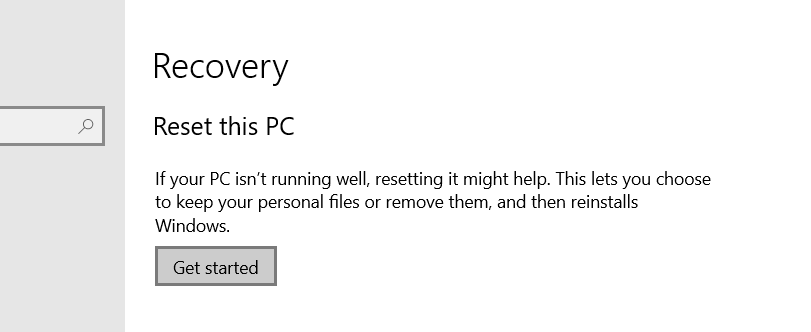
- Among the options presented, locate ‘Go back to an earlier build’. Click on ‘Get Started‘ beneath this option to initiate the process.
After reverting to a previous version of Windows, reinstall QuickBooks Desktop (QBD) and check if the migration tool works as intended.
Solution 2: Troubleshoot the compatibility issues with QuickBooks
Note: You may be facing a compatibility problem with the migration tool or QuickBooks itself if you have currently updated the windows or rolled it back to a previous build.
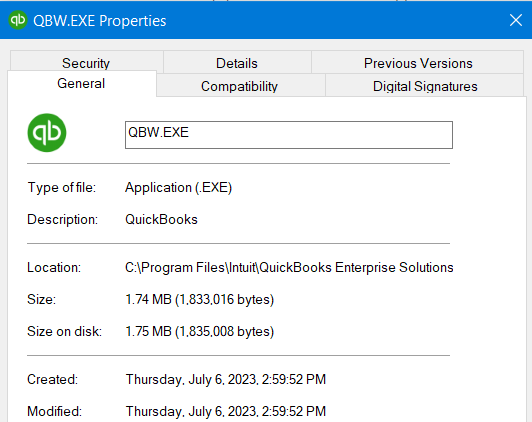
- Go to the QuickBooks application, right-click on it, and from the list of options click “open file location”.
- Next, choose the QB file and right-click on it, then click on “properties”.
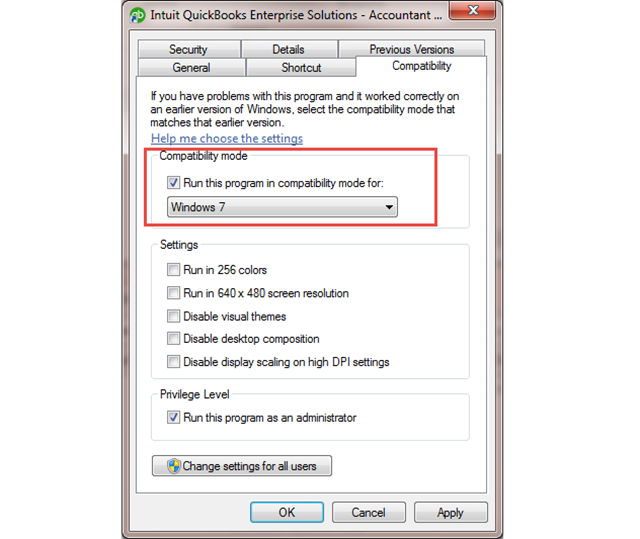
- From the properties dialog box, click on the “compatibility” tab. Now select the Windows version from the “Run the program in the compatibility mode for” dropdown.
- Click on Apply and then press OK.
Run App Compatibility Troubleshooter
- Open the control panel and from all control items, click on programs and features.
- Now click on “Run programs made for previous versions of Windows” and open the “Windows Program Compatibility Troubleshooter”.
- Click on Next or the advanced button, and click on QuickBooks from the list of programs visible.
- The troubleshooter will run and provide you with a list of the issues with the application.
- Click on next to fix the errors or issues.
Solution 3: Update windows
You might not be using the correct Windows version with the version of QuickBooks you are using. Follow these short steps to update the windows correctly.
- To install the updates, click on start >> settings >> update and security >> Windows update, at the end select ‘check for updates’. If you can see the updates, install them.
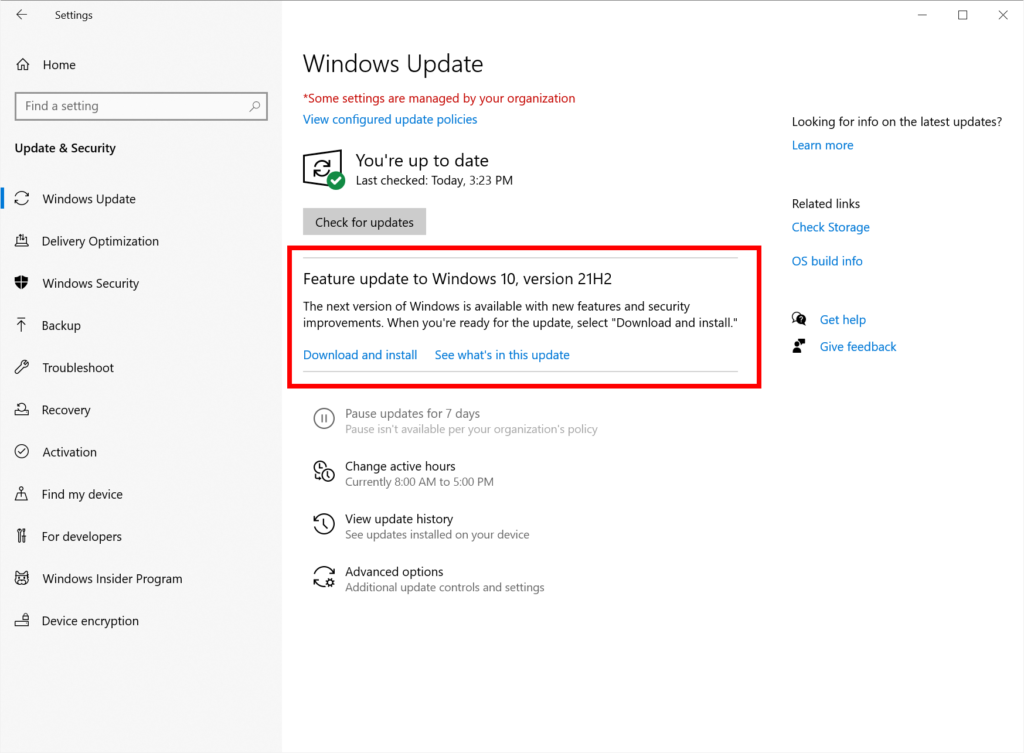
- Go to the Windows update assistant for a manual update if you won’t get the 21h2 version automatically.
- If you are continuously running into problems when updating the device, see this blog on how to Troubleshoot problems updating Windows.
This process might restore your QuickBooks to function again and you may migrate your data.
Solution 4: Uninstalling Third-party Backup Applications
If you suspect a third-party app might be disrupting the QuickBooks Desktop Migration, follow these steps to remove it:
Accessing Preferences:
- Launch the QuickBooks Desktop as an Administrator user.
- Navigate to the “Edit” menu located at the top of your interface.
- Choose “Preferences” from the drop-down menu. This action will open the Preferences window.
Navigating to Integrated Applications:
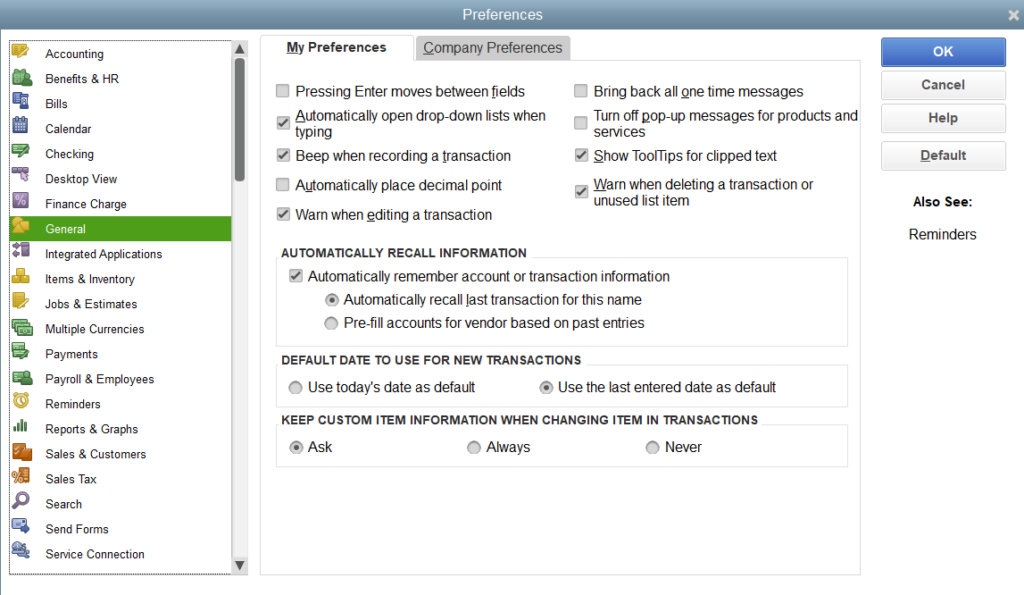
- In the Preferences window, you will see a list on the left side. From this list, select “Integrated Applications.”
Adjusting Company Preferences Settings:
- Once you’re inside the Integrated Applications settings, click on the “Company Preferences” tab. Here, you will see a list of all integrated programs connected to QuickBooks.
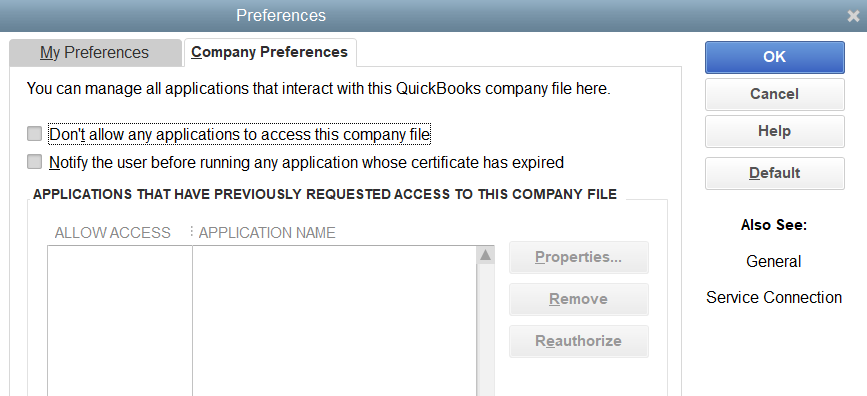
Removing Third-party Applications:
- Locate the third-party app you wish to disconnect from QuickBooks.
- Uncheck the box next to its name. Doing so will disallow the application from connecting to QuickBooks and accessing your company’s data.
By following these steps, you can ensure that no external applications are hindering the migration process within QuickBooks.
Solution 5: Uninstall pending QBDT maintenance release update
First, save all your pending work and close the QuickBooks program before proceeding with these steps.
- The ‘Download Location’ listed on the ‘Options tab’ of the Update QuickBooks Desktop window can be reached by following the Windows path. (Note that the “Program Data” Directory is a hidden directory; to locate “Program Data,” you must set Windows to expose hidden files and folders.)
- Find the “EPatch” and “NewFeatures” directories once you have arrived at the Download Location directory. These ought to contain current dates that match to the time that QuickBooks downloaded the uninstalled update.
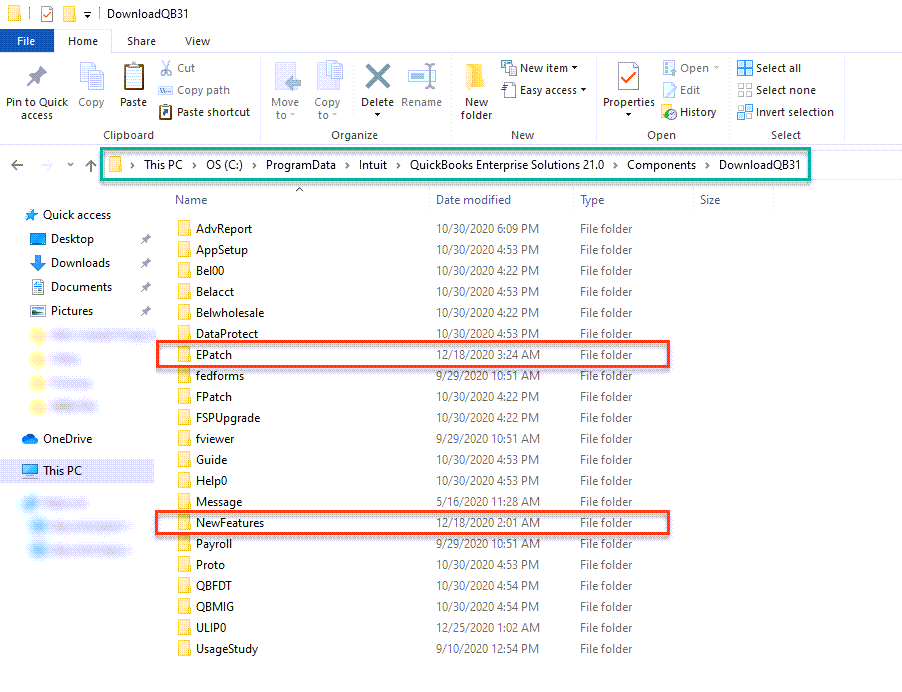
- Follow these procedures after opening the EPatch Directory:
- When the directory is open, click “Select all” to highlight all of its contents.
- Select “Delete” while the directory’s whole contents are highlighted to remove everything from it, and then shut the directory.
- Open the NewFeatures Directory and again follow the two steps we have mentioned earlier in the EPatch Directory.
- Now that the maintenance release update has been removed, shut the Windows Explorer.
Solution 6: Update Your QuickBooks Desktop Program
If you’re experiencing migration issues while transferring QuickBooks Desktop from one computer to another, it might be due to outdated software. We’ve noticed that neglecting regular updates can cause such problems. We strongly recommend following the steps below to update your QuickBooks Desktop.
- Go to the “Help” section of the QuickBooks and select “Update QuickBooks” Desktop from there.
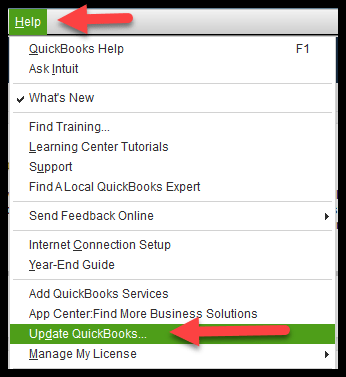
- Choose the “Update Now” option and then select “Get Updates“.
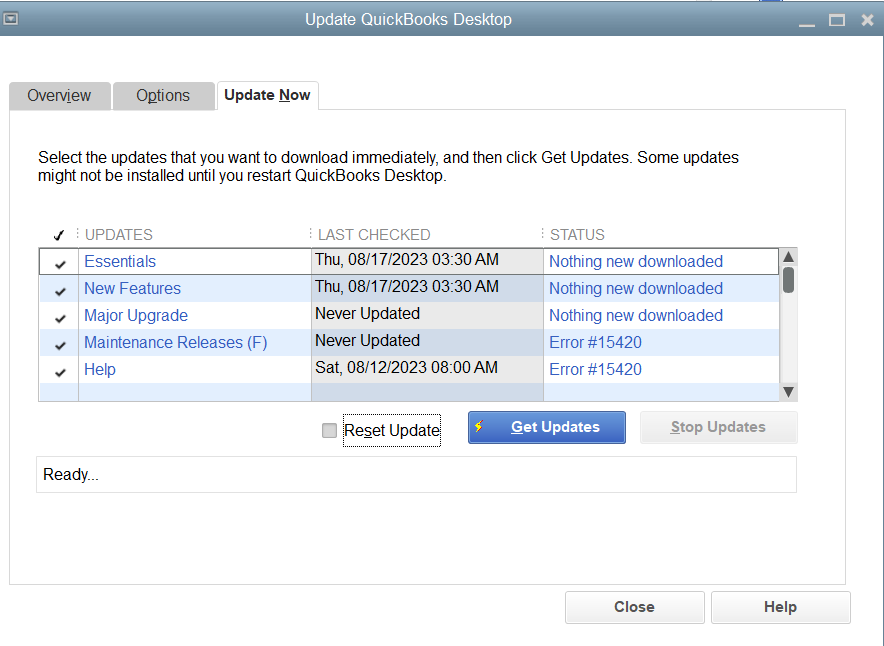
- Now close and Reopen the QuickBooks, install the updates if asked, and restart your PC once the installation finishes.
If you encounter the ‘QuickBooks Migration Failed Unexpectedly’ error, you might want to try the previous steps again. If the issue persists, close the following processes: QBW32.exe, QBW.exe, QBCFMonitorService.exe, qbupdate.exe, QBDBMgr.exe, QBDBMgrN.exe, and QBMapi32.exe. Once done, restart QuickBooks.
Solution 7: The migration service file gets corrupted or deleted
move.quickbooks.bat file is responsible for the QBD migration tool to run smoothly. If this file gets corrupted or damaged or deleted accidentally then the tool will not run and you will not be able to migrate the company file.
As it is an important service file, you can’t create it. The only solution to move out of this problem is to uninstall this version of QuickBooks and re-install the app again.
Solutions for QuickBooks Migration Failed Unexpectedly in MAC
“QuickBooks Migration Failed” is a rare issue on macOS. Nonetheless, we’ve identified 5 solutions. We’re confident that these solutions will effectively address the “QuickBooks Migration Failed Unexpectedly” problem on Mac.
Solution 1: Verify System Requirements
- Check the compatibility of your Mac operating system with the QuickBooks version you are using.
- Ensure that your Mac meets the minimum system requirements specified by QuickBooks.
- Update your Mac operating system to the latest version if necessary.
Solution 2: Check Disk Space and Permissions
Verify that you have sufficient disk space on your Mac to accommodate the QuickBooks migration failed unexpectedly process. Run Disk Utility to check and repair any disk permissions issues:
- Go to “Applications” > “Utilities” > “Disk Utility.”
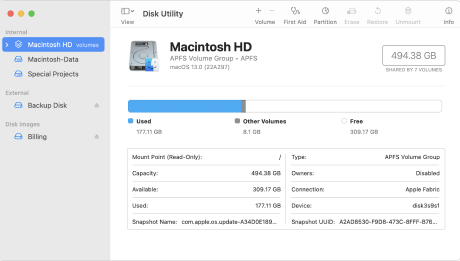
- Select your Mac’s hard drive and click on the “First Aid” tab.
- Click on “Repair Disk Permissions” and allow the process to complete.
- Retry the migration process after completing the disk permissions repair.
Solution 3: Update QuickBooks and Mac
Ensure you are using the latest version of QuickBooks. If not, update it to the latest release:
- Launch QuickBooks and go to the “QuickBooks” menu.
- Select “Check for Updates” and follow the prompts to install any available updates.
Check for updates to your Mac operating system:
- Click on the Apple menu in the top-left corner of your screen.
- Select “System Preferences” > “Software Update.”

- Install any pending updates for your Mac.
Solution 4: Repair QuickBooks Installation
- Close QuickBooks if it is open.
- Open the “Applications” folder and locate the QuickBooks application.
- Press and hold the “Control” key, then click on the QuickBooks application and select “Get Info.”
- In the QuickBooks Info window, click on the lock icon and enter your administrator password to unlock it.
- Expand the “Sharing & Permissions” section and make sure you have “Read & Write” access.
- Close the QuickBooks Info window.
- Reopen QuickBooks and retry the migration process.
Solution 5: Create a New Company File
Create a new company file in QuickBooks:
- Open QuickBooks and select “File” > “New Company.”
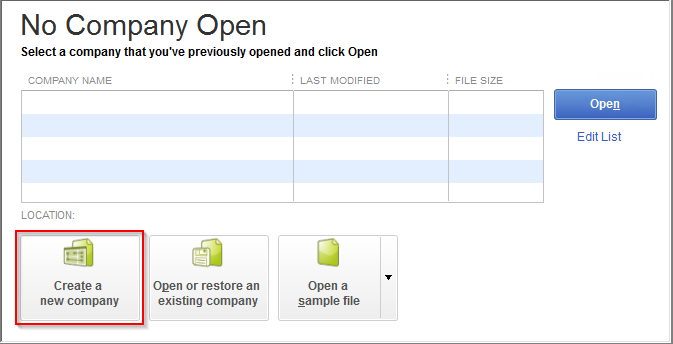
- Follow the prompts to set up a new company file.
- Manually enter or import your data into the new company file.
Attempt the migration process using the new company file and check if the error persists.
Additional method if you are transferring data from QBDT to QBO
Use the beanstalk method to migrate data from QBD to QBO
- Log in to the QBD program then move to the company and then to the company screen.
- Now, navigate to the bottom of the company screen. You can see the export option there (export company file to QB online).
- Next, log in to the cloud profile and set up QB online cloud profile if you do not have it already.
- Here, select the destination where you would like to migrate the company file. Next, sign in to QB online accountant.
- Check mark the “Yes move my stock using FIFO, select the starting date” and choose the required date from which you need to migrate your data.
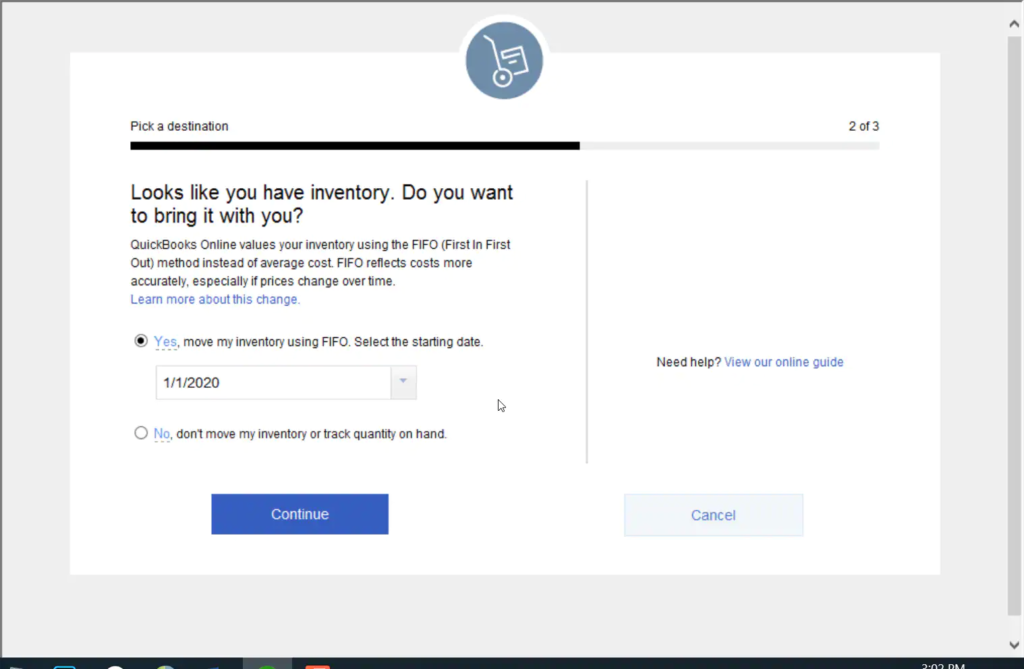
- Click on continue to end the process and migrate your company data to QuickBooks online.
Let’s wrap it up
We trust that the steps outlined in this article have been effective in resolving the issue of “QuickBooks Migration Failed Unexpectedly” on Windows 11. If you find yourself still grappling with migration troubles after following these measures, we encourage you to reach out to the QB Data Migration Team for specialized assistance. You can contact them for support tailored to your unique situation.
Frequently Asked Questions
What to do if I am unable to move my QuickBooks Data?
If the QuickBooks migration process is failing, again and again, that case, we recommend you not to do it on your own, instead, contact qualified experts and Let them analyze and fix it.
Can corrupt company files cause the QuickBooks migration to fail?
Yes, corruption within your company files can indeed lead to migration failures. It’s essential to ensure that your company files are in good condition before attempting a migration. If you suspect corruption, consider running a verification and rebuild process within QuickBooks, or seek assistance from the QuickBooks expert.
Will I lose any data if the QuickBooks migration fails?
Generally, your original data should remain intact on the source computer if the migration fails. However, to avoid any risk of data loss, it’s always recommended to have a recent backup before attempting to migrate.
How can I ensure a smooth migration of my QuickBooks data?
To ensure a smooth migration, follow these tips:
1. Use the QuickBooks Migration Tool as instructed, ensuring it’s the latest version.
2. Make sure both the source and destination computers meet the necessary system requirements.
3. Perform a backup of your company files before initiating the migration.
4. Close all unnecessary programs during the migration to prevent any conflicts.