
Encountering QuickBooks Event ID 4 Error is a common issue for users while launching the QuickBooks Integration Manager. This Windows-related error can interrupt QuickBooks operations and may affect the performance of the software if not resolved properly.
The issue is commonly associated with Microsoft .NET Framework problems and may appear differently depending on the QuickBooks version being used. Some common examples include:
- QuickBooks Desktop Pro 2023 showing ABORT_CLOSE errors
- QuickBooks Premier Edition 2023 displaying SetNameDriverAndPort failures
- QuickBooks Premier Accountant Edition 2020 encountering validation issues
- QuickBooks Point of Sale 2020 showing OpenPrinter call failures
- QuickBooks Enterprise Solutions encountering server attachment issues
In some situations, the error may also occur:
- During QuickBooks installation on Windows Server
- While transferring QuickBooks to another computer
- When launching QuickBooks Integration Manager
If ignored, the error may affect QuickBooks performance and company file accessibility. Therefore, resolving the issue promptly is important.
What Causes QuickBooks Event ID 4 Error?
Several Windows components work together to ensure QuickBooks functions properly. If these supporting components become damaged or incompatible, QuickBooks may encounter Event ID 4 Error.
One of the most common reasons behind this issue is problems with Microsoft .NET Framework 4.0 or later versions, especially on Windows 11 systems.
Other possible causes include:
- Damaged or corrupted QuickBooks company files
- Malware or virus infections affecting QuickBooks components
- Partial or corrupted QuickBooks installation
- Errors within the Windows Registry
- Missing or deleted QuickBooks-related files
- QuickBooks crashing while opening company files
- Compatibility issues between QuickBooks and Windows components
Symptoms of QuickBooks Event ID 4 Error
Users may experience the following symptoms when the error occurs:
- QuickBooks freezes or crashes unexpectedly
- Integration Manager fails to connect with QuickBooks
- Windows becomes slow or unresponsive
- Error messages repeatedly appear on the screen
- Active Windows applications may stop working properly
- Keyboard and mouse responses become delayed
- QuickBooks performance and efficiency are affected
Some users may see error messages such as:
“Integration Manager could not connect to QuickBooks. Please make sure that it is open.”
or
“QuickBooks Event ID 4 – An unexpected error has occurred.”
Step-by-Step Solutions to Fix QuickBooks Event ID 4 Error
Solution 1: Reinstall Microsoft .NET Framework
Issues with the Microsoft .NET Framework are one of the most common reasons behind Event ID 4 errors.
Steps to Reinstall .NET Framework:
- Press Windows + R to open the Run window
- Type
appwiz.cpland press Enter - Open Programs and Features
- Locate Microsoft .NET Framework
- Select Uninstall/Change
- Restart your computer
- Reinstall the latest version of Microsoft .NET Framework
- Restart your system again
After reinstalling the framework, reopen QuickBooks Integration Manager.

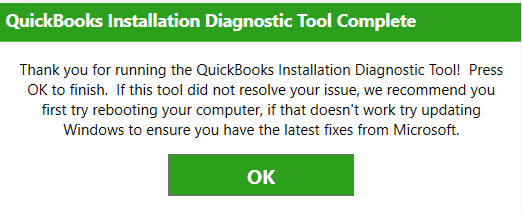
Solution 2: Run QuickBooks Install Diagnostic Tool
QuickBooks Install Diagnostic Tool can help repair installation-related problems automatically.
Steps:
- Download and install QuickBooks Tool Hub
- Open Tool Hub
- Navigate to Installation Issues
- Select QuickBooks Install Diagnostic Tool
- Allow the scan to complete
- Restart your computer
This tool helps repair damaged QuickBooks installation components and Windows dependencies.

Solution 3: Use QuickBooks Clean Install Tool
If installation corruption continues, performing a clean installation may help resolve the issue.
Steps:
- Open QuickBooks Tool Hub
- Select Installation Issues
- Choose Clean Install Tool
- Select your QuickBooks version
- Follow the on-screen instructions
- Reinstall QuickBooks Desktop

A clean installation removes damaged QuickBooks files and reinstalls fresh program components.

- Click Continue and then OK.
Solution 4: Run QuickBooks File Doctor
QuickBooks File Doctor can resolve even major errors with the company file. Follow our detailed guide on repairing company file errors using QuickBooks File Doctor.
- Download and Install QuickBooks Tool Hub:
- QuickBooks File Doctor is part of the QuickBooks Tool Hub, a collection of tools designed to fix common issues.
- First, download the QuickBooks Tool Hub from the official Intuit website. Choose the version most appropriate for your QuickBooks.
- After downloading the file (it should be a .exe file), double-click to open it and follow the on-screen instructions to install it. You may need to agree to terms and conditions and choose an installation location.
- Open QuickBooks Tool Hub:
- Once installed, open the QuickBooks Tool Hub. You can find it either on your desktop or in the Start menu.
- The tool hub has a user-friendly interface with different tabs for various issues.
- Navigate to the Company File Issues Tab:
- In the QuickBooks Tool Hub, click on the ‘Company File Issues’ tab. This section is specifically for resolving file-related problems.
- Run QuickBooks File Doctor:
- Inside the ‘Company File Issues’ tab, you’ll see an option to run QuickBooks File Doctor. Click on it.
- QuickBooks File Doctor will open in a new window. It might take a moment to start up.

- Select Your Company File:
- In the File Doctor, you’ll be prompted to select your company file. If you see your file in the list, select it.
- If your company file isn’t listed, click the ‘Browse and search’ button to find your file manually in your computer’s folders.
- Check Your File and Network:
- You will then choose whether you are fixing a company file or network issues. If you’re dealing with Error 179, you’re likely focusing on the company file.
- Select the appropriate option. If you’re unsure, QuickBooks File Doctor can check both.
- Enter QuickBooks Admin Password:
- Next, you will need to enter your QuickBooks admin password when prompted. This is necessary for the tool to access and fix your file.
- Wait for the Diagnosis and Repair:
- After entering your password, the tool will start diagnosing and repairing any issues. This process can take some time, especially for larger files or more complex issues.
- Follow Any On-Screen Prompts:
- Depending on the issues found, you may receive additional prompts or instructions. Follow any on-screen guidance provided by the tool.
- Finish and Reopen QuickBooks:
- Once the process is complete, close the File Doctor and reopen QuickBooks.
- Check to see if your issue (Event ID 4 Fix in this case) has been resolved.
Step 5: Manually fix .NET Framework
You might have to manually fix the .NET Framework in certain instances when QuickBooks event ID 4 unexpected error 5 appears. Follow these steps:
- Close all active programs.
- Open the Task Manager by pressing Ctrl + Shift + Delete keys.
- Navigate to the Processes tab.
- Find and end the processes for QBW32.exe, QBupdate.exe, and QBDBMgrn.exe.

- Close other running applications in the same manner.
- Open the Control Panel via the Windows Start menu.
- Click on Programs and Features.
- Choose the Uninstall a Program option.
- Select Turn Windows Features On or Off.
- Find .NET Framework from the program list.
- Check the settings for .NET Framework 4.5 or above and .NET Framework 3.5 SP1.
Follow the relevant steps according to the checkboxes of these two settings. This includes checking or unchecking boxes, applying changes, and restarting your device.
Step 6: Use Quick Fix My Program
QuickBooks Tool Hub has several utilities to resolve QuickBooks Event id 4, including the Quick Fix My Program. Follow these steps:
- Download the QB Tool Hub from the official Intuit website.
- Save the file in your default downloads folder or choose a new location.
- Open the file location after a successful download and double-click the QuickBooksToolHub.exe file.
- Follow the installation prompts and agree to the terms and conditions.
- Once installation and setup are complete, double-click the QuickBooks Tool Hub icon on your desktop.
- Navigate to the Program Problems section.

- Select Quick Fix My Program to resolve performance issues and lags caused by the event id 4 error.
Step 7: Reinstall QuickBooks Desktop
Reinstalling QuickBooks Desktop may help users to avoid persistent QuickBooks Event ID 4 errors. Below, we have shared a step-by-step guide:
Essential Preparations Before Reinstalling QuickBooks
Before you begin the reinstallation, it’s critical to safeguard your data:
- Create a backup of your QuickBooks company file to safeguard your business data.
- Ensure you have your QuickBooks Desktop download file or your installation CD at hand, along with the license and product numbers.
Steps to Uninstall QuickBooks Desktop
- Access the Windows Start menu, enter “Control Panel” in the search bar, and open the Control Panel.
- Select “Programs and Features” or “Uninstall a Program,” depending on your view settings.
- Scroll through the list to find QuickBooks, click on it once to select it.
- Click on the “Uninstall/Change” button and follow the instructions to remove QuickBooks from your computer.
- After uninstalling, restart your computer and boot into Safe Mode. You can usually do this by pressing the F8 key during startup and selecting Safe Mode from the options presented.
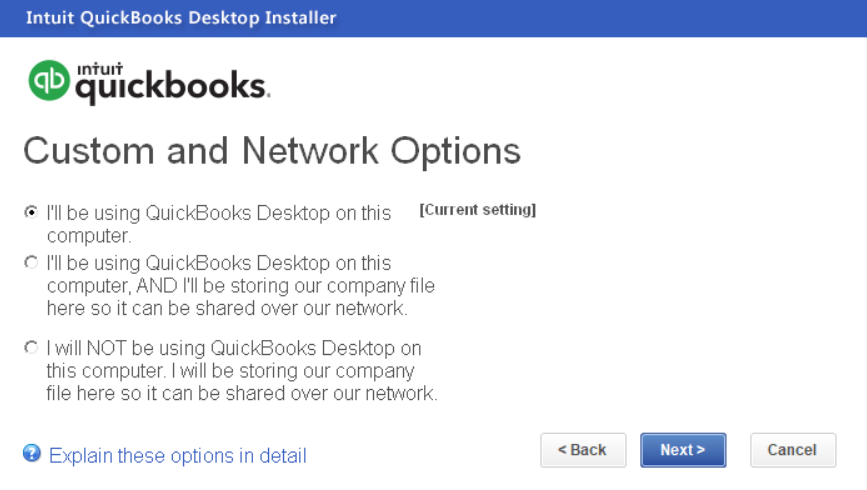
Steps to Install QuickBooks Desktop
- In Safe Mode, if you have the QuickBooks download file, navigate to it and double-click the QuickBooks.exe file. If using an installation CD, insert it into your CD/DVD drive.
- The installation wizard should open automatically. Begin by following the on-screen prompts, and accepting the Software License Agreement when requested.
- Enter your Product and License numbers when prompted during the installation process.
- Continue to follow the wizard’s instructions, choosing the appropriate installation types and options for your setup.
- Once the installation process is complete, reboot your computer, allowing it to start normally.
- Open QuickBooks after the restart to ensure the program is installed correctly and is running smoothly.
Step 8: Rectify the Registry Editor
Damaged Windows registry entries associated with QuickBooks may trigger Event ID 4 errors.
Steps:
- Open the Run window
- Type
regedit - Open Registry Editor
- Backup QuickBooks-related registry entries
- Correct damaged or invalid registry values carefully
⚠️ Important: Incorrect changes in the Windows Registry may affect system stability.

Step 9: Use Windows System File Checker
Windows System File Checker is a handy tool included with Windows that allows you to scan for and restore corruptions in Windows system files. Here’s how you can use it:
- Click the Start button.
- Type “Command” in the search box (don’t press Enter yet).

- While holding CTRL + Shift on your keyboard, press Enter.
- Click “Yes” when prompted by the Permission Dialog Box.
- A black box will open with a blinking cursor; type “sfc /scannow” and press Enter.
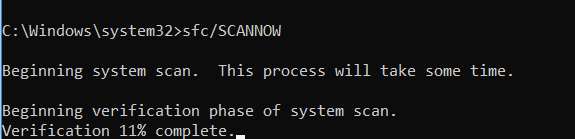
- The System File Checker will begin scanning for Error 4 and other system file problems.
- Follow the on-screen commands to complete the process.
Final Thoughts
QuickBooks Event ID 4 Error is generally associated with Microsoft .NET Framework issues, damaged QuickBooks installation files, corrupted company files, or Windows Registry problems. The error can interrupt QuickBooks Integration Manager and impact regular accounting operations if left unresolved.
By following the troubleshooting methods discussed above, users can usually resolve the issue and restore QuickBooks functionality successfully.
If the problem continues after applying these solutions, advanced QuickBooks diagnostics may be required to identify deeper system or company file issues.
Frequently Asked Questions
Q: Can QuickBooks Event ID 4 Error lead to data loss?
A: Yes, if not addressed promptly, this error could potentially lead to data loss within QuickBooks.
Q: Are there any prerequisites before attempting to fix QuickBooks Event ID 4 Error?
A: Yes, it is recommended to back up your QuickBooks company file and ensure you have the necessary installation files and license information before troubleshooting.
Q: Is it safe to attempt to fix QuickBooks Event ID 4 Error on my own?
A: While there are manual steps you can take, QuickBooks handles sensitive data, and incorrect troubleshooting can cause further issues. It’s often best to consult with a QuickBooks Data Services Expert, especially if you’re not confident in the process.
Q: What is the role of the .NET Framework in QuickBooks functionality?
A: The .NET Framework is a Windows component that supports the running of QuickBooks Desktop. Incompatibilities or issues with .NET Framework can cause errors like the Event ID 4.
