
QuickBooks Error H505 is one of the most common multi-user issues businesses face today, especially with the shift to Windows 11, Server 2022, and modern network environments. As Intuit continues to upgrade QuickBooks Desktop for 2024 and 2025, many companies rely on its advanced features—automated billing, inventory tracking, real-time reporting, and smooth multi-user access—to manage daily operations efficiently.
But despite these improvements, connectivity problems can still occur when multiple users try to access the same company file over a network. Error H505 appears when a workstation is unable to reach the server or host computer where the company file is stored. In most cases, users see messages like:
- “QuickBooks Error H505”
- “This company file is on another computer, and QuickBooks needs help connecting.”
This error usually indicates a blocked network path, incorrect hosting setup, missing QuickBooks services, or new firewall rules implemented by recent Windows updates. With today’s hybrid office setups, VPN connections, and changing security standards, H505 has become more frequent—but also completely fixable.
If you’re facing QuickBooks Error H505, you’re not alone — and you don’t need to stress. This guide will walk you through the exact steps to fix the issue and get your multi-user mode running smoothly again. But if the error continues or you’d prefer expert assistance, our QuickBooks Desktop Support team is just a call away.
Simply contact our toll-free number +1-888-538-1314, and one of our certified specialists will help you diagnose the problem and resolve it quickly and safely. We’re here 24/7 to make sure your QuickBooks works the way it should — without downtime, confusion, or risk to your data.
What is QuickBooks Message Code H505?

Error Code: H505 arises within the QuickBooks accounting software when a user tries to access a company file on a different computer that is not correctly configured or set up to host the file for multi-user access. This error belongs to the H series of errors, which generally stem from issues related to network and hosting configurations. The occurrence of Error H505 suggests that there are issues with the hosting setup or network configurations that hinder QuickBooks from accessing the company file from a remote workstation. Resolving this error requires precise adjustments to the network or configuration settings to enable the proper multi-user connection to the company file.
What Could be Causing QuickBooks Error Code H505?
Here are some possible reasons to check out:
- You may face Message Code “QBCFMonitorService not running on this computer“
- Your computer’s firewall might be blocking communication with the company file.
- The hosting configuration settings could be incorrect or improperly set up.
- QuickBooks may not be able to scan the files/folders with the Database server on the server.
- The .nd file might be damaged, missing, or incorrect.
- QuickBooks might be unable to trace the IP address of the computer.
- The QuickBooks DBXX service might not be running.
- DNS settings might be incorrect.
Symptoms For QuickBooks Desktop Error H505
Keep an eye out for these signs:
- The primary symptom, signaling that the software cannot switch to or operate in multi-user mode.
- Users experience frequent disconnections or interruptions while trying to access the company file on a network.
- Display of the error message “Error H505” or similar messages indicating issues with network setup or access.
- General slowdown in network performance when using QuickBooks, which may affect other network-related operations.
- The workstation or server hosting QuickBooks might experience unexpected crashes when attempting to access the company file.
- Difficulty or inability to access the company file located on another computer within the network.
- The QuickBooks application may become unresponsive or freeze when trying to open or operate the company file from a remote location.

Troubleshooting Steps For QuickBooks Error H505
The QuickBooks Error H505 is typically related to network issues or issues with the configuration of your settings when attempting to switch to multi-user mode. If you encounter this error, the following steps may assist you in resolving it:
Solution 1: Use the QuickBooks File Doctor Tool
The QuickBooks File Doctor tool is a built-in feature offered by Intuit that can help diagnose and repair various network and company file-related issues. It can be particularly effective in addressing the QuickBooks Error H505. Here’s how to use this helpful tool:
Step 1: Download and Install QuickBooks File Doctor
If you don’t have QuickBooks File Doctor installed on your computer:
- Visit the official QuickBooks website and download the QuickBooks Tool Hub.
- Once downloaded, double-click on the QuickBooksToolHub.exe file to begin the installation process.

- Follow the on-screen prompts and accept the terms and conditions to install the tool.
- Once installed, you will see an icon on your desktop. Double-click on it to open the tool.

Step 2: Run QuickBooks File Doctor
- Inside the QuickBooks Tool Hub, select the ‘Company File Issues’ tab.
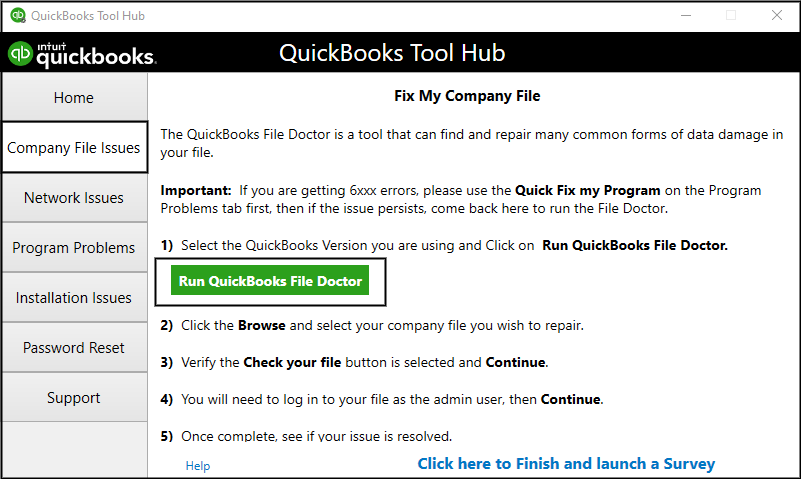
- Click on the “Run QuickBooks File Doctor” button. This will open the File Doctor tool.
- In the tool, click on the ‘Browse’ button and locate your company file (.QBW) that is causing the error.

- Once selected, you will have two options for checking your file: ‘Check your file’ and ‘Check your file and network’. If you’re trying to fix the Error H505, opt for ‘Check your file and network’.

- Click on ‘Continue‘ and enter your Admin password when prompted.

- Click on ‘Next‘, and the File Doctor will begin the scan and repair process. This may take some time depending on the size of your file and the nature of the issues.
Step 3: Review the Results and Follow the Suggested Steps
Once the tool finishes its process, it will provide a report detailing any issues it found and the steps it took to fix them. Follow any additional instructions given by the tool if necessary.
Keep in mind that although QuickBooks File Doctor is a potent tool, it may not be able to fix every problem. If the QuickBooks Error H505 persists even after using the tool, it would be prudent to explore other solutions for further assistance.
Solution 2: Check Prior QBD Services in workstation & server
Ensuring the correct setup of QuickBooks services and hosting settings is crucial for the smooth operation of QuickBooks in a multi-user environment. Follow these steps to check these settings:
Step 1: Verify the Workstation Services
To start, make sure that the QuickBooksDBXX and QBCFMonitor services are running. Follow these steps:
- Press the “Windows” or “Start” button.
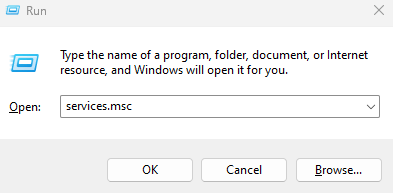
- Press the “Window+R” keys.
- In the run box, type “service.msc” and press the “Enter” tab.

- In the service window, search for “QuickBooksDBXX service“.
- If the QuickBooksDBXX service is not visible: Confirm that the Database Server Manager is installed on the server.
- Open the QuickBooks program if it’s running on the server.
- Make sure hosting is enabled by verifying it.
- Open the “QuickBooksDBXX” service and confirm that the startup type and service status have started.

- Click the “Recovery” tab and save the changes.
Step 2: Verify the hosting server
By following the steps below, you can ensure that none of the workstations are in hosting mode except for the server computer. This crucial configuration can frequently lead to QuickBooks Desktop Error H505.
- Open QuickBooks on each Workstation computer.
- Go to “File” then “Utilities“.
- If you see “Host Multi-User Access” on the list, the computer is unable to host the file.
- If you see the “Stop Hosting Multi-User Access” option, choose it.
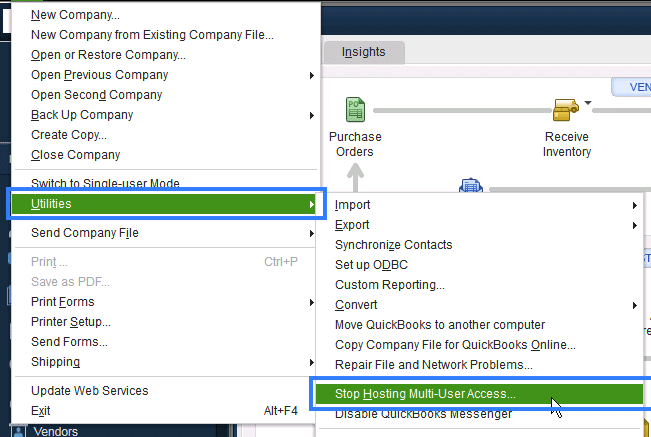
- Go to the “Company“.
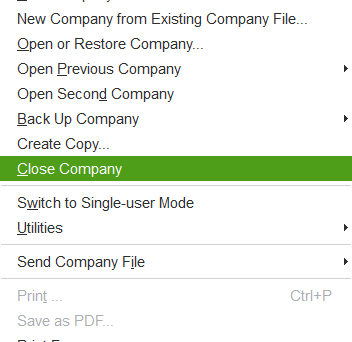
- Choose the “File Must Be Closed” window.
- Click “Yes” to finish.”
If QuickBooks error H505 still appears go to the next solution to fix it.
Related Article: How to Fix QuickBooks Error H202?
Solution 3: Configure Firewall Program to Fix QuickBooks Error H505
If the Checking QuickBooks Services didn’t resolve your QuickBooks Code H505 issue, then manually configuring your firewall might do the trick. Here’s how:
Add Firewall Port Exception for QuickBooks:
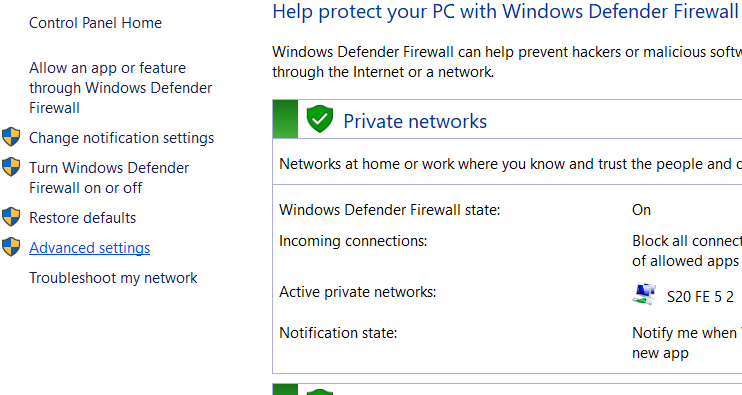
- Open Windows Start Menu, type “Windows Firewall,” and open it.

- Go to Advanced Settings.
- Right-click Inbound Rules, then choose New Rule. (Later, do the same for Outbound Rules.)

- Select Port and click Next.

- Ensure TCP is selected.
- Enter the specific ports for your QuickBooks version:
- QuickBooks Desktop 2020 and later: 8019, [Dynamic Port].
- QuickBooks Desktop 2019: 8019, [Dynamic Port].
- QuickBooks Desktop 2018: 8019, 56728, 55378-55382.
- QuickBooks Desktop 2017: 8019, 56727, 55373-55377.
- Note: QuickBooks 2019 and later use dynamic ports assigned during installation.
- After entering the port number, click Next.
- Choose Allow the Connection and then Next.
- If prompted, ensure all profiles are checked and click Next.
- Name your rule, like “QBPorts(year),” and select Finish.
- Repeat these steps for Outbound Rules.
Create Windows Firewall Exceptions for QuickBooks Programs:
- Open Windows Start Menu, search for “Windows Firewall,” and open it.
- Go to Advanced Settings.
- Right-click Inbound Rules, then choose New Rule. (Repeat later for Outbound Rules.)
- Select Program and click Next.

- Choose This Program Path, then Browse.

- Locate and select each of the executable files listed below, then click Next.
- The executable files and their locations are provided in the table below.
- Choose Allow the Connection, click Next, ensure all profiles are checked, and then click Next.

- Name your rule, like “QBFirewallException(name.exe),” and select Finish.

- Repeat these steps for creating Outbound Rules.
Executable Files and Locations:
| Executable File | Default Location |
|---|---|
| AutoBackupExe.exe | C:\Program Files\Intuit\QUICKBOOKS YEAR |
| Dbmlsync.exe | C:\Program Files\Intuit\QUICKBOOKS YEAR |
| DBManagerExe.exe | C:\Program Files\Intuit\QUICKBOOKS YEAR |
| FileManagement.exe | C:\Program Files\Intuit\QUICKBOOKS YEAR |
| FileMovementExe.exe | C:\Program Files\Intuit\QUICKBOOKS YEAR |
| QuickBooksMessaging.exe | C:\Program Files\Intuit\QUICKBOOKS YEAR |
| QBW32.exe | C:\Program Files\Intuit\QUICKBOOKS YEAR |
| QBDBMgrN.exe | C:\Program Files\Intuit\QUICKBOOKS YEAR |
| QBServerUtilityMgr.exe | C:\Program Files\Common Files\Intuit\QuickBooks |
| QBCFMonitorService.exe | C:\Program Files\Common Files\Intuit\QuickBooks |
| QBLaunch.exe | C:\Program Files\Common Files\Intuit\QuickBooks |
| QBUpdate.exe | C:\Program Files\Common Files\Intuit\QuickBooks\QBUpdate |
| IntuitSyncManager.exe | C:\Program Files\Common Files\Intuit\Sync |
| OnlineBackup.exe | C:\Program Files\QuickBooks Online Backup |
Note: The path “C:\Program Files (x86)” is used for 64-bit Operating systems.
Lastly, restart your computer to ensure all changes are applied. If the QuickBooks Desktop Error H505 remains, consider the following subsequent solution.
Solution 4: Ping Your Server from a Workstation
To effectively troubleshoot QuickBooks Error H505, a key step is to verify network connectivity between your server and workstations. This solution involves a few technical steps but is crucial for diagnosing network-related issues that might be causing this error.
Step 1: Enable Network Discovery on Server and Workstations
This step is vital to ensure your server and workstations can communicate over the network.
- On your server and affected workstations, open the Windows Start Menu.
- Type “Network” and open Network and Sharing Center.
- Click on Change advanced sharing settings.
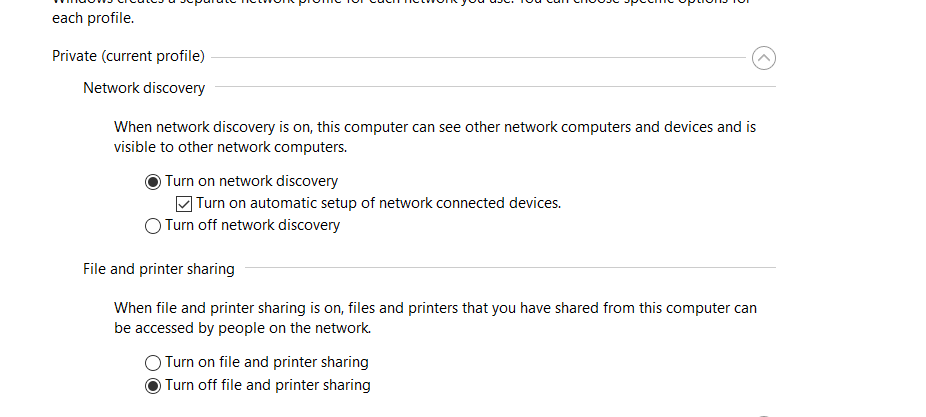
- Make sure Turn on network discovery is selected in both the Network Discovery and File and Printer sharing sections. This allows your devices to see each other on the network, which is essential for QuickBooks multi-user mode.
Step 2: Obtain Your Server Name from the Server Computer
Knowing your server’s name is crucial as it will be used to test connectivity from the workstations.
- On your server computer, open the Windows Start Menu.
- Type “Run” in the search bar and open Run.

- Type “CMD” in the Run window, then press Enter.
- In the CMD window, type “ipconfig/all” and press Enter.
- In the Windows IP Configuration section, find the Host Name.
Note down the server name displayed on the right. This name is what your workstations will use to connect to the server.
Step 3: Test the Server Connection from Each Workstation
This step helps determine if there are any network connectivity issues between your server and workstations.
- On each workstation experiencing Error H505, open the Windows Start Menu.
- Type “Run” in the search bar and open Run.
- Enter “CMD” in the Run window, and then press Enter.

- In the CMD window, type “ping [your server name]” (replace [your server name] with the actual server name, omitting the brackets) and press Enter. This command checks the network connection to your server.
Assessing the Results:
- No Packet Loss: If each packet is replied to with no loss, your server connection is stable.
- Packet Loss or Slow Replies: If there’s packet loss or a very slow reply, this indicates a network issue. Stop here and seek help from an IT professional to resolve your network connectivity problems.
By following these steps, you can isolate whether the H505 error is due to network issues, allowing for a more targeted approach in resolving the error.
Solution 5: Recreate the .ND (Network Data) File
The .ND file stores network data for QuickBooks, including IP address and port information. If you encounter QuickBooks Desktop Error H505 in a multi-user setup, recreating the .ND file can help resolve this issue.
Here is a step-by-step guide on how to recreate the .ND file:
- Close QuickBooks.
- Navigate to the folder where your QuickBooks company file is stored.
- Locate the .ND file associated with your QuickBooks company file. It will have the same filename as your company file but with an .ND extension.
- Delete the .ND file.
- Open QuickBooks and go to the File menu.
- Select Utilities and then click on Host Multi-User Access. This action will recreate the .ND file.
- Try opening your company file again to see if the error H505 has been resolved.
By following these steps, you ensure that QuickBooks regenerates the .ND file, potentially clearing out any incorrect settings or corruption that might have been contributing to Error H505.
Solution 6: Set Proper Folder Permissions
If improper permissions are set, it can lead to issues like QuickBooks Desktop Error H505. Adjusting the folder permissions where the company file is stored can resolve these errors.
- Right-click on the folder where the QuickBooks company file is stored and choose Properties.
- Go to the “Security” tab and click “Edit” to change permissions.
- Ensure that groups or users related to QuickBooks have the necessary permissions: “Full Control, or at the very least, Modify, Read & Execute, List Folder Contents, and Read and Write“.
- Confirm the changes by clicking Apply, then OK to close the dialog.
Winding up
We hope the solutions provided above helped you swiftly address QuickBooks Error Code H505. However, if the issue persists, it might require more specialized attention. In such cases, we encourage you to contact QB Data Service Experts. Let them assist you in resolving QuickBooks Error H505 effectively. Their expertise can provide targeted support and ensure that your QuickBooks setup functions smoothly.
Frequently Asked Question
1. Why do only some workstations show QuickBooks Error H505 in QuickBooks while others connect normally?
This usually happens when QuickBooks hosting settings differ between machines. One workstation might be incorrectly set to host multi-user mode, or its server path may not match the others. It can also occur if one system sits on a different network profile or subnet. Aligning hosting settings and verifying the server connection typically resolves this inconsistency.
2. Can a VPN or Remote Desktop session trigger QuickBooks Desktop Error H505?
Yes. VPN or RDP connections often alter IP addresses, routing, or security permissions. When this happens, QuickBooks cannot properly locate the server hosting the company file, resulting in H505. If you must use a VPN, ensure proper port forwarding and stable routing to the host machine.
3. Does QuickBooks Error H505 indicate a damaged or corrupted company file?
Not usually. Error H505 is primarily a network communication problem, not a file damage issue. Your company file (.QBW) is typically safe. However, if you see H505 along with 6000-series errors, run a Verify & Rebuild to rule out data corruption.
4. Will renaming or changing the server’s computer name cause Error H505?
Yes. If the server name or IP address changes and mapped paths or hosts files still point to the old one, QuickBooks cannot reconnect — triggering QuickBooks Error Code H505. After renaming, always update your mapped drive letters and refresh QuickBooks Database Server Manager.
5. How does Windows 11 or Server 2022 affect QuickBooks Error H505?
Newer Windows versions have stricter network firewalls, SMB restrictions, and enhanced sharing rules. If these settings block QuickBooks ports or discovery services, H505 appears. Enabling SMB, turning on Network Discovery, and allowing QuickBooks ports fixes most Windows 11/Server 2022 issues.
6. Can using a NAS drive or cloud-sync folder cause H505 in QuickBooks?
Yes. QuickBooks does not officially support storing the company file on NAS devices or sync folders such as OneDrive or Dropbox. These environments often break hosting, permissions, or service-level communication — leading to H505. Always store the company file on a local server or supported hosting environment.
7. What’s the fastest way to diagnose the root cause of H505?
Running the QuickBooks Database Server Manager and scanning the folder often reveals immediate issues such as wrong paths, permission errors, or inactive QuickBooks services. Checking whether QBCFMonitorService and QuickBooksDBXX are running also provides quick insight.
