

Despite how smoothly you may feel things are running with your QuickBooks accounting software, it’s not uncommon for errors to spring up unexpectedly. One common issue users frequently encounter is the ‘QuickBooks Error Code 15240’. This error can be particularly bothersome as it often occurs during updates of the QuickBooks desktop or payroll software. Incorrect Internet Explorer settings or inaccurate date and time settings can also trigger this error.
The QuickBooks 2023 Error Code 15240 typically displays one of two error messages:
Warning: QuickBooks Error 15240: HRESULT XXXXX – the QuickBooks update did not complete successfully.
Warning: QuickBooks Error 15240: HRESULT XXXXX – the payroll update did not complete successfully.
Crucially, you might come across additional errors while updating the QuickBooks Desktop or downloading a payroll update, including: “File exists: The file you specified cannot be opened. Make sure that it is not being used by another program.” “Internet connection error: unknown error.”
What exactly is QuickBooks Payroll Error 15240, and why its occur?
Put simply, QuickBooks Update Error 15240 can arise when you attempt to download an update for your software. This error can interrupt your work and appears often. Several factors can contribute to this error, which we will discuss in detail throughout this article.
Recognizing the inconvenience this issue causes, we’ve put together this guide to provide potential solutions for this particular payroll issue. We recommend reading this information thoroughly. Alternatively, you may reach out to our QuickBooks Payroll Customer Support team for immediate assistance, saving you time and effort.
What causes QuickBooks Error 15240?
Several factors can trigger this error, including:
- Using an outdated version of QuickBooks desktop.
- Logging in as a Windows admin or not running the application as an admin.
- Specifying an incorrect or invalid download link, even though the download is active.
- Operating QuickBooks multi-user mode in a terminal service setting.
- Dealing with corrupted registry files or damaged Windows.
- Encountering a damaged QuickBooks update.
How can you identify QuickBooks Error 15240?
Several signs and symptoms can indicate the presence of QuickBooks Error Code 15240:
- Failure in installing the latest QuickBooks update.
- Unsuccessful payroll update.
- Inability to conduct payroll in QuickBooks.
This error primarily impedes payroll updates. As a result, the system may crash frequently. Windows might also run slowly and not respond to mouse or keyboard inputs. In some instances, the system might freeze for a few seconds, which can be quite frustrating.
Troubleshooting of QuickBooks Update Error 15240
Several strategies can be employed to rectify QuickBooks Payroll Update Error 15240. Let’s delve into each one of these methods:
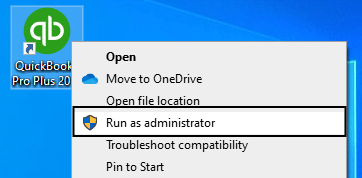
Method 1: Use QuickBooks as an Administrator
Often, to avoid encountering errors, it’s necessary to utilize QuickBooks with administrative privileges. Follow these steps:
Start by right-clicking on the QuickBooks icon located on your desktop. Select the ‘Run as Administrator’ option. Then, open the Properties and verify the Compatibility for all users.
Method 2: Validate Internet Explorer Settings
If running QuickBooks as an administrator proves ineffective, consider validating your Internet Explorer settings by following these steps:
Start by selecting the gear icon, then select Internet options. Navigate to the Advanced tab. Under the Security tab, tick ‘Use SSL 2.0’ and ‘Use SSL 3.0’. Lastly, select ‘Apply’ and then click the ‘OK’ button.
Method 3: Assess Third-party Firewall Settings
Occasionally, firewall settings might obstruct smooth communication between the software and other files. To rectify this:
Consult the third-party firewall developer for guidance on adjusting the settings to allow QuickBooks to download and install updates. Ensure the following files have unrestricted access through the firewall:
- Qbw32.exe
- Qbupdate.exe Additionally, verify that ports 80 and 443 are enabled.
Method 4: Review System Date and Time Settings
To do this, select the time display on the system and opt for ‘change date and time settings’. Set the correct date and time, and then choose ‘Apply’ and ‘OK’.
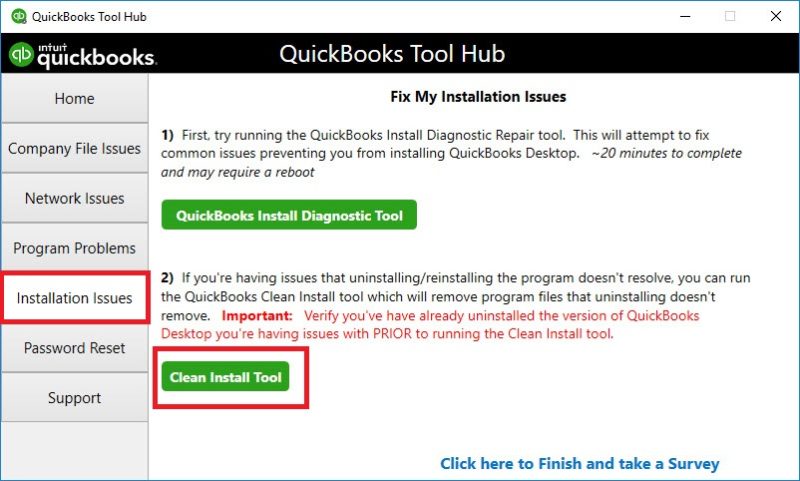
Method 5: Reinstall QuickBooks using the Clean Install Tool
This method can eliminate any accumulated junk resulting from frequent use. Always ensure to have a complete backup of your company file to prevent data loss. Here are the steps to perform a clean install of QuickBooks desktop:
- Uninstall QuickBooks desktop from the system.
- Rename the installation folders by downloading and running the QuickBooks Clean Install Tool.
- Reinstall the QuickBooks software. Alternatively, the Clean Install Tool can be run directly from the QuickBooks Tool Hub.
Method 6: Confirm the Correct Settings on Security Software
At times, security and anti-malware software can interfere with QuickBooks, leading to issues. Make sure to properly configure these software settings to ensure smooth operations within QuickBooks.
let’s delve into the specifics of Method 6, focusing on how to confirm the correct settings on four popular security software: Norton, McAfee, Avast, and Bitdefender.
Norton:
- Open the Norton software and click on the ‘Settings’ option in the main window.
- In the Settings window, click on ‘Firewall’ or ‘Network’.
- Under the ‘General Rules’ option, click on ‘Configure’.
- Now, you should see a list of rules that have been set. Look for rules related to QuickBooks.
- If such rules are found, ensure they are set to ‘Allow’. If no such rules are present, you need to create new ones.
- To create a new rule, click ‘Add’ and follow the instructions to permit access for QuickBooks. Make sure to specify ‘Allow’ for this rule.
- Save your changes and exit the settings.
McAfee:
- Open McAfee and click on the ‘Firewall’ menu.
- Select ‘Settings’ and then click on ‘Traffic Controller’.
- Look for any rules concerning QuickBooks. If such rules exist, make sure they are set to ‘Allow’.
- If there are no such rules, you need to add a new rule. Click ‘Add’, then ‘Allow’ and browse to the QuickBooks .exe file.
- After adding the rule, click ‘Apply’ to save the changes.
Avast:
- Open Avast, then select ‘Protection’.
- Choose the ‘Firewall’ option and then select ‘Application settings’ at the bottom of the page.
- You will see a list of applications. Look for QuickBooks.
- For QuickBooks, make sure ‘Friends In’ and ‘Friends Out’ are checked. If not, add the rule by selecting ‘New Group’ and ‘New Application Rule’
- Select ‘Browse’, locate the QuickBooks .exe file and then click ‘Add’.
Bitdefender:
- Open Bitdefender and go to the ‘Protection’ window.
- Click on ‘View Features’, then select the ‘Settings’ icon in the ‘Firewall’ module.
- Go to the ‘Rules’ tab, and click on ‘Add Rule’.
- In the ‘Add Rule’ window, browse for QuickBooks .exe file in the ‘Application’ field.
- Set the ‘Network type’ to ‘Trusted’, ‘Protocol’ to ‘Any’, and the ‘Event’ to ‘Both’. Make sure ‘Enabled’ is turned on.
- Click ‘OK’ to save the changes.
Read More: A Complete Guide on How to Resolve QuickBooks Error 15276
Method 7: Assign Windows Permissions to QuickBooks Installation Folders
To resolve the error, assign Windows permissions to QuickBooks installation folders by performing the following steps:
- Close QuickBooks. Navigate to C:\Program Files.
- For 64-bit users, visit C:Program Files (x86).
- Right-click on the Intuit folder and choose the Properties option.
- Move to the Security tab and select the Advanced option.
- Ensure that the folder owner is the user group. If not, take ownership of the Intuit folder by following these steps:
- Select ‘Change’ beside the owner name on the Advanced Security Settings Window.
- In the ‘Enter the object name to select’ field, type ‘users’ and select ‘Check Names’.
- Click ‘OK’.
- Tick ‘Replace owner on sub-containers and objects’.
- Click ‘Apply’ and ‘OK’. Select ‘Users’ on the Permissions Window, then click on ‘Full Control’. Click ‘Apply’ and ‘OK’. Attempt to download the updates again. If the error persists, repeat these steps for the following folders:
- C:\Program Files\Common Files\Intuit
- (For 64-bit users) C:\Program Files (x86)\Common Files\Intuit
- C:\ProgramData\Intuit
- C:\Users\Your User Name\AppData\Local\Intuit
Remember, professional help is always just a phone call away!
The aforementioned steps should largely aid in rectifying the QuickBooks Payroll Error 15240. However, if you’re still facing issues, do not hesitate to contact us.
Reach out immediately via our dedicated QB Data Recovery Services Expert line and speak with our QuickBooks enterprise customer support team today. Feel free to contact us with any QuickBooks-related queries; you’ll assuredly find the most satisfying solutions here. We are available to assist you 24/7.
