

QuickBooks, equipped with the latest tools and technologies, serves as a powerful application for businesses. It allows users not only to produce data but also to secure and retrieve it with maintained quality. However, a surprising issue has come to the fore.
Upon updating their QuickBooks application, some users find their data missing, which can result from various causes. The main culprit often is an interrupted backup completion process. Understandably, this issue triggers panic among users, as they dread the loss of vital company data. Missing even a single data component can cause chaos within an organization. But don’t worry if you’re facing this issue – this article is here to help. We aim to highlight other potential causes and provide the necessary solutions.
What is the QuickBooks Data Missing After Update?
The issue of data missing in QuickBooks after update can cause significant distress and disorder among its users. When updating their QuickBooks application, users might be unable to locate previous records, files, and documents. It could be a portion or all of the data—for instance, data from the past 1.5 years might vanish. This glitch has troubled many users, leading to significant data loss. Also, performing a backup and restore operation once doesn’t always fix the problem. Therefore, it’s essential for users to find a solution promptly.
When the error reoccurs persistently, it complicates users’ tasks. It doesn’t feel right to lose important data while using a trusted accounting application. Hence, it’s crucial to understand why this problem occurs and how to effectively tackle it.
Reasons For QuickBooks entries keep disappearing after upgrade
Users may lose all or a part of their data due to various circumstances. Here are some prevalent causes behind the missing data issue –
- If a power outage or internet disconnection occurs during the regular backup process, it might result in an unsuccessful backup.
- While transitioning to a new device or upgraded version of QuickBooks, the software might not restore all data, requiring manual transfer of some transactions.
- If the most recent backup file gets accidentally deleted, leading to access to an older, smaller backup file.
- Incompatibility between QuickBooks and your device might cause some records to go missing in the backup.
- Continuously relocating the backup file from one place to another.
- A corrupt company or backup file might trigger this error.
- Having incorrect files in QuickBooks can also cause this issue.
- Software glitches or bugs can lead to missing attachments in QuickBooks.
- Data loss or corruption might occur if users don’t follow a suitable update process.
- An unstable internet connection can contribute to the missing data issue post QuickBooks update.
- This issue might also arise due to malicious attacks by viruses or malware.
Troubleshooting Steps to Recover Lost QuickBooks Desktop Data After Update
Here are the instructions to find and recover transactions that disappeared after upgrading QuickBooks. These transactions might have been entered in the wrong files, which caused them to disappear post-upgrade. This issue can lead to users questioning, “Will I lose my data if I upgrade QuickBooks?”
Follow the subsequent steps to locate your missing transactions:
Step 1: Audit Trail Report Verification
The first thing to do when transactions are missing in QuickBooks is to check the Audit Trail Report. This report shows transactions recorded in the company file, even those that have been deleted. It can also provide historical transactions and any changes made to them.
To access this, follow these steps:
- Go to the Reports menu.
- Select Accountant & Taxes.
- Choose Audit Trail at the end.
- Upon reaching the audit trail location, you can customize the report according to your needs.
- Select the Customized Report button at the top of the report page.
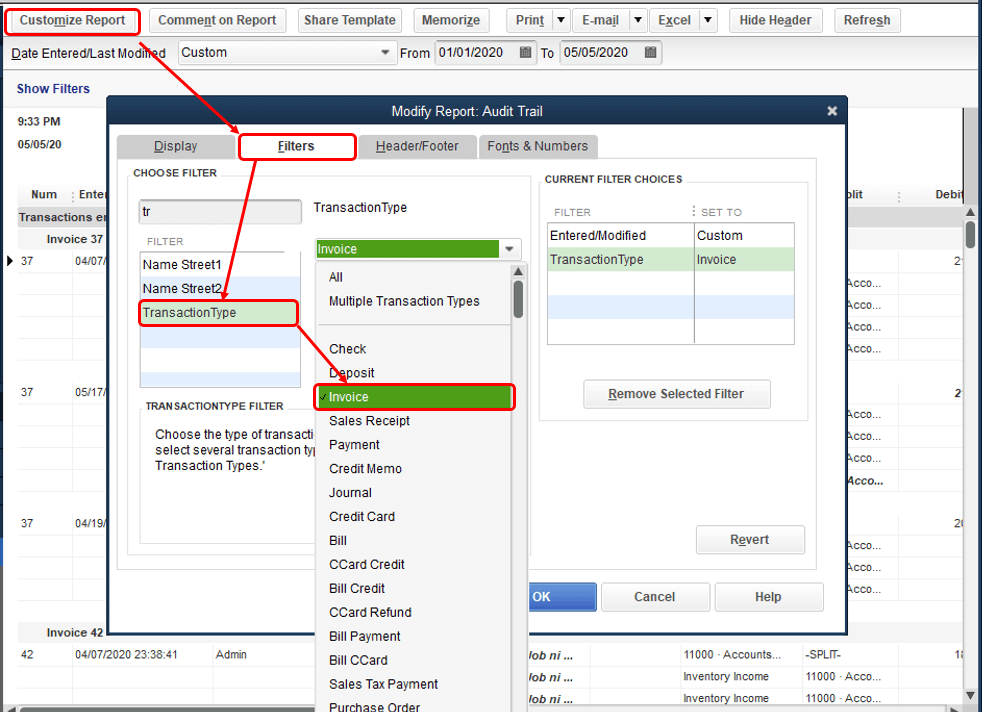
- Select the Filters tab and add filters to find your transaction.
- Start with the Transaction Type filter, Name Filter, and Date.
- By doing this, you can easily locate the person linked to the transaction on a specific date.
- Click OK to view the report.
- Various items will now appear on the page. Some lines with slight changes to the same transactions will also be visible.
- Look for a section in bold highlighting the part of transactions that were modified and saved from their previous amount.
- The Last Modified By column indicates which users were logged into QuickBooks when the changes were made.
If the Audit Trail Report does not help locate the missing transactions, proceed to the next step.
Step 2: Check for Multiple Company Files
If the Audit Trail report doesn’t locate the missing transactions, it’s essential to check if another company file contains the missing transactions. This might occur if someone else in the network works on a different company file, leading to transactions disappearing after the upgrade.
To determine which company file is currently open:
- Launch the QuickBooks software.
- Press the F2 key on your keyboard.
- The Product Information Screen will appear, displaying information about the current company file.
- Scroll down the window to view the File Information window, which shows the File Path of the file you’re currently using.
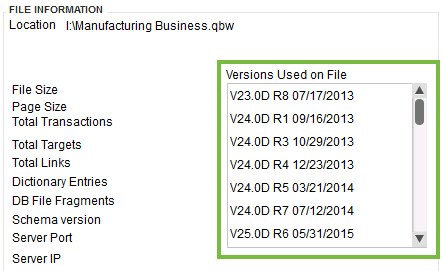
- Make sure this path is the same as your regular company file where everyone is working.
- This process should be carried out on all network computers to ensure everyone is working on the same file.
Step 3: Inspect for Condensation
Check whether anyone recently performed the Condense operation on your files, potentially causing the error. This feature in QuickBooks removes information before a specific date to reduce the company file size or for other purposes.
To check if a condense operation has been run:
- Open QuickBooks.
- Press the F2 key.
- The Product Information window will open.
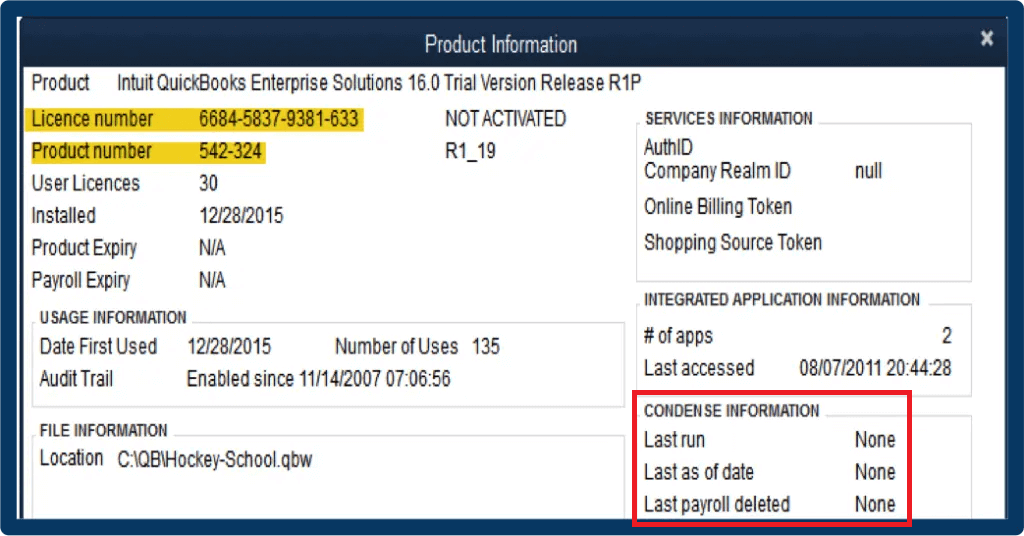
- A Condense Information section will appear on the right.
Step 4: Re-enter Missing Transactions
After verifying the audit trail, inspecting the different company files and the condense feature, you might need to enter the missing transactions again if they’re still not found.
The blog post also presents general solutions for dealing with data loss after updating QuickBooks. These solutions include restoring the last backup, using the Verify and Rebuild Data tools, employing the QuickBooks Auto Data Recovery Tool, choosing the correct company file, and reviewing the register history to find transactions.
Wrapping it up
if these methods do not yield successful results in recovering QuickBooks data missing after an update, we highly recommend seeking professional assistance. Reach out to QB Data Recovery Service for specialized support tailored to your issue. Their team of experts uses advanced tools to not only retrieve lost data but also preserve its integrity. Don’t hesitate to dial for prompt and effective assistance. It’s crucial to address data loss promptly to avoid any further complications or data discrepancies in your QuickBooks files.
