

QuickBooks, universally recognized as premier accounting software, relies on a range of essential background services and operations for smooth functioning. One key service is QBCFMonitorService, more formally known as QuickBooks Company File Monitoring Service. This service operates through the qbcfmonitorservice.exe file. Generally, you can discover this related file in the “C:\Program Files\Common File\Intuit\QuickBooks” folder. Users might come across the “QBCFMonitorService Not Running On This Computer” message when trying to employ the QuickBooks Database Server Manager to set up multi-user access. Curiously, when verifying the status of the service in the service window, it seems to be running without any hiccups. To resolve the “QBCFMonitorService Not Running On This Computer 2023 Windows 11” error, a series of corrective actions might need to be implemented. Continue perusing this article for a detailed comprehension of the reasons and viable resolutions for this error.
What is QBCFmonitorservice not running on this server computer 2022 Windows 10?
The QBCFMonitorService is a component of QuickBooks Desktop located in the installation directory, which is initiated via the QBCFMonitorService.exe file. This service plays a crucial role in facilitating access to files in multi-user mode, allowing workstation computers within a company to link with the server computer and access company files. If this process gets disrupted for any reason, users may encounter the error message “QBCFMonitorService terminated unexpectedly 2022 windows 10.”
This issue usually arises when the QBCFMonitorService.exe file ceases to run. Commonly, this can happen if a firewall is blocking the file from running or if the file itself has become corrupted. Additionally, this error prevents the use of multi-user mode in QuickBooks. If you’re facing this issue with your QuickBooks software, follow the remedies outlined below to swiftly rectify the problem.
Reasons that cause QBCFmonitorservice unexpectedly terminated?
Numerous factors could prompt QuickBooks to present the “QBCFMonitorService Not Running On This Computer 2023 Windows 11” error. A primary instigator for QBCFMonitorService-related issues can be Windows Defender or third-party firewall applications, which may inhibit QuickBooks’ connection with the company file housed on the server. In addition, several other reasons can contribute to the malfunctioning of the QBCF Monitor Service, which are delineated below:
- The QBCFMonitorService keeps stopping due to the deletion or improper installation of its associated file (qbcfmonitorservice.exe) on the server.
- The issue could be due to the unexpected termination of QuickBooks QBCFMonitorService on the server computer.
- The QuickBooks Server hosting your company file may not be properly configured.
- An outdated QuickBooks Database Server Manager may also contribute to the problem.
- Malicious software may render your file unexecutable.
- Potential conflicts with other programs installed on the system may lead to the “qbdbpf log file monitor service not running locally” error.
- Damaged or corrupted Windows registry entries could potentially cause this issue.
- An improperly installed or corrupted QuickBooks Desktop could also result in the QBCFMonitorservice not running issue.
Read More: How to fix QuickBooks Multi-user mode error H505

Resolution for QBCFMonitorservice Not Running on this computer
Dealing with QuickBooks errors, particularly those linked to the QBCFMonitorService, can indeed be a tricky affair. Preserving the integrity of your data files throughout the error resolution process is a key concern. Therefore, we have formulated a set of strategies that not only focus on resolving the problem at hand but also ensure the safety of your data. For an efficient troubleshooting procedure, please diligently follow the steps provided below.
Solution 1: Restart the QuickBooks Database Server Manager(QBDBMGRN)
Here are the steps to restart the QuickBooks Database server manager in windows and Linux:
Restarting QuickBooks Database Server Manager on Windows Server:
Step 1: On your keyboard, press Windows key + R to open the Run command.
Step 2: Type in ‘services.msc‘ and click OK. This will open the Services window.
Step 3: Scroll down and look for the ‘QuickBooksDBXX‘ service. The ‘XX’ refers to your version of QuickBooks.
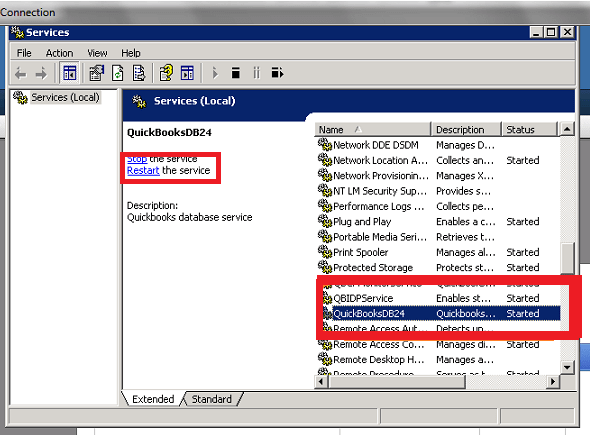
Note: In the context of QuickBooks, ‘QuickBooksDBXX’ refers to the service related to your specific version of QuickBooks, where ‘XX’ represents the year of the version. For instance, ‘QuickBooksDB28’ corresponds to QuickBooks 2018, whereas ‘QuickBooksDB29’ corresponds to QuickBooks 2019. Therefore, ensure you replace ‘XX’ with the correct number reflecting your particular QuickBooks year version when executing the above instructions.
Step 4: Right-click on the service and select ‘Restart’. If the ‘Restart’ option is greyed out or not available, click ‘Start’ instead.
Restarting QuickBooks Database Server Manager on Linux Server:
Step 1: Open the terminal.
Step 2: Type in the following command to stop the service: sudo service QuickBooksDBXX stop. Replace ‘XX’ with your version of QuickBooks.
Step 3: To start the service again, type: sudo service QuickBooksDBXX start.
Note: Ensure you have administrative privileges to stop and start services on Linux. Also, remember to replace ‘XX’ with your specific QuickBooks version.
Solution 2: Verify QB Database server manager installation
Windows Server:
- Verify QuickBooks Database Server Manager:
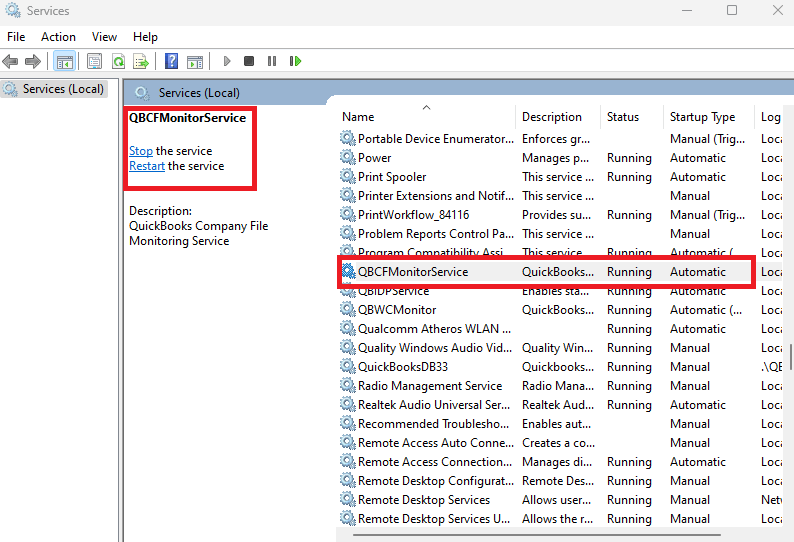
- Press Windows key + R to open the Run window.
- Type ‘services.msc‘ and click on ‘OK’.
- Scroll down to find services named ‘QuickBooksDBXX’ (where XX represents the year of your QuickBooks version) and ‘QBCFMonitorService’. If these are present, then QuickBooks Database Server Manager is installed.
- If it’s not installed, follow these steps to install it:
- Insert the QuickBooks CD into your server computer. An installation wizard will open.
- Follow the on-screen instructions until you reach the “Custom or Network Options” screen.
- Choose the “Install Database Server Only” option.
- Follow the remaining prompts to complete the installation.
- After installation, restart your server.
Note: Make sure to not open QuickBooks on your server after installation. The server is only used to host your files.
Linux Server:
Installation of QuickBooks Database Server Manager on a Linux server is more complex and may require familiarity with Linux commands and operations. Here are the basic steps:
- Verify QuickBooks Database Server Manager:
- Open Terminal.
- Use the command (replace ‘XX’ with your version year).
- If the service is running, you’ll see it in the output.
- If it’s not installed, you’ll need to download the QuickBooks Linux Database Server Manager from the Intuit official website, then use the package manager for your Linux distribution to install it. This process can vary greatly depending on your specific Linux distribution, so it may be beneficial to consult the help documentation for your distribution or contact a Linux professional for assistance.
Note: QuickBooks for Linux is designed to operate in a network environment with the data files stored on a Linux server, and the client machines running QuickBooks on Microsoft Windows.
Keep in mind that you must have administrative rights on the server computer to install and set up QuickBooks Database Server Manager.
Solution3: Update QuickBooks Desktop and Database server manager
here are the detailed, plagiarism-free steps for updating both QuickBooks Desktop and QuickBooks Database Server Manager:
QuickBooks Desktop:
- Open your QuickBooks Desktop application.
- Go to the ‘Help’ menu located at the top, and select ‘Update QuickBooks Desktop‘.
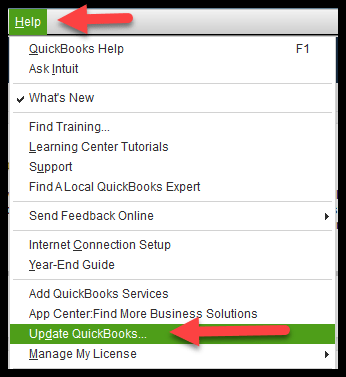
- In the ‘Update QuickBooks’ window that appears, click on the ‘Update Now’ tab.
- To remove all previous update downloads, you can choose to check the ‘Reset Update’ box before clicking the ‘Get Updates’ button.
- Click ‘Get Updates’.
- Once the updates are complete, restart QuickBooks. On reopening, if prompted to install the new release, select ‘Yes’.
Note: Ensure your internet connection is stable throughout the update process.
QuickBooks Database Server Manager:
- On the server computer, open the QuickBooks Database Server Manager.
- Click on the ‘Updates’ tab.
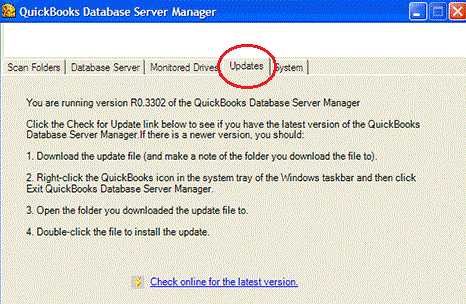
- Click on ‘Check for Updates’. If an update is available, you will be prompted to download it.
- After downloading the update, you will be asked to install it. Click ‘Yes’ to proceed with the installation.
- Restart your server after the update is installed successfully.
Note:
- It’s important to note that all users must exit QuickBooks before starting the Database Server Manager update.
- Always back up your company files before updating your QuickBooks software or Database Server Manager.
- Also, remember that you need to update the QuickBooks Database Server Manager every time you update QuickBooks Desktop to ensure compatibility.
Solution 4: Enable QuickBooks Services For windows and Linux Firewall
Windows:
- Navigate to the Control Panel.
- Click on ‘System and Security’, then ‘Windows Defender Firewall’.
- Select ‘Advanced Settings’.
- In the left panel, click ‘Inbound Rules’, and then ‘New Rule’.
- In the ‘Rule Type’ dialog box, select ‘Program’, and then ‘Next’.
- Click ‘This program path’, then ‘Browse’.
- Locate and select each file from the list below, and then click ‘Next’:
- AutoBackupExe.exe
- Dbmlsync.exe
- DBManagerExe.exe
- FileManagement.exe
- FileMovementExe.exe
- QuickBooksMessaging.exe
- QBW32.exe
- QBDBMgrN.exe
- QBServerUtilityMgr.exe
- QBCFMonitorService.exe
- QBLaunch.exe
- QBUpdate.exe
- IntuitSyncManager.exe
- OnlineBackup.exe
- Choose ‘Allow the Connection’, and then click ‘Next’.
- Ensure all profiles are marked if you want to allow the connection from all network types, and then click ‘Next’.
- Give the rule a name (you can use the name of the program), and then click ‘Finish’.
- Repeat the steps for each file in the list.
Linux:
Note: In Linux, you’ll generally be using the terminal and the ‘iptables’ command:
- Open a Terminal window.
- For each service you want to allow through the firewall, you’ll need to add a rule. Here’s a general command format:
- You would replace
[Port Number]with the specific port that the service uses. You’ll need to look up or know what ports each service uses. - Press Enter after each command.
- After you’ve added all your rules, save them with this command:
Wrapping up
The guidance provided in this article aims to assist you in resolving the ‘QBCFMonitorService Not Running on this Computer 2023 Windows 11‘ issue. If you find these steps challenging due to technical complexities, don’t hesitate to reach out to QB Data Service Experts. There, you can explain your situation related to the QBCFMonitorService startup issue and receive a tailored solution to your problem.
Frequently Asked Questions
1. Does QBCFMonitorService need admin permissions to run?
Yes. If the service is running under a standard user account, it may fail to start after system updates. Setting the service to run under Local System Account or granting admin rights can fix permission-related failures.
2. Can antivirus software stop QBCFMonitorService?
Absolutely.
Many antivirus tools like Avast, AVG, McAfee, or Quick Heal mistakenly block:
*qbcfmonitorservice.exe
*QBDBMgrN.exe
*QuickBooks ports (8019, 56728, 55378, 55382)
Add them to the allowed list to prevent service failure.
3. Does this issue occur more on servers or workstations?
It happens more often on server computers hosting the company file because:
*More users connect
*Server runs multiple QuickBooks services
*Permissions and network rules are stricter
8Workstations face this issue mainly after Windows updates.
