
Renowned for its versatility, QuickBooks is a go-to accounting tool for tasks ranging from elementary bookkeeping to intricate financial management. Yet, even with years of refinement, it is not without flaws. For some, these recurring issues overshadow its benefits, with one major problem being its tendency QuickBooks has stopped working on Windows despite numerous attempted fixes and it persists no matter how many articles you have read or solutions you have applied. In this article, we have tried to accumulate some of the most effective solutions using our years of experience to help QuickBooks users get rid of it easily.
What is QuickBooks Desktop Has Stopped Working in Windows 10/11?
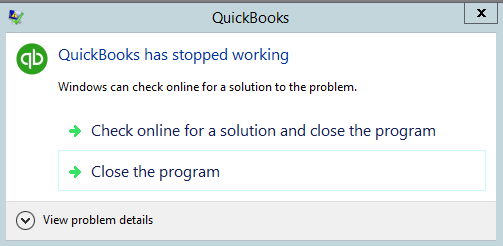
QuickBooks has stopped working is one such anomaly that can occur due to numerous reasons. The popup states: “QuickBooks has stopped working. Windows can check online for a solution to the problem and next Check online for a solution and close program else close program.” This issue may arise if your QuickBooks program file contains some bugs or if your workstation is incapable of providing sufficient computing power to run QuickBooks. Subsequently, you will learn more about each reason and the corresponding solutions.
Common Reasons for QuickBooks Desktop Stopped working in Windows?
Since we all know there could be numerous reasons that bring to the surface the issue “QuickBooks Desktop has stopped working,” we have managed to compile the most common ones in the list below:
- A very definite reason is corrupted QuickBooks program files.
- Damaged or missing Windows components may bring to the surface the issue “QuickBooks Desktop has stopped working.”
- If you are using an outdated QuickBooks software version, it is very likely that you may face this issue.
- Lack of sufficient system resources (RAM or CPU) can lead to QuickBooks not functioning properly.
- You may have installed some programs that are conflicting with the QuickBooks Desktop application.
- Damaged Windows Registry entries are very likely to cause the issue “QuickBooks has stopped working.”
- Your system may contain virus or malware infections, which prevent QuickBooks from launching.
- If your QuickBooks is crashing after opening the company file, you may have a corrupted company file.
- Incomplete or improper installation of QuickBooks program files can lead to such issues.
- Since the .NET Framework is crucial to running applications on Windows, an outdated or incompatible .NET Framework may cause the “QuickBooks stopped working” issue.
- An overloaded or corrupted QBWUSER.INI file may bring to the surface the issue of QuickBooks being unable to open.
- Improper configuration of Windows User Account Control (UAC) may restrain QuickBooks from opening.
- If you are using a QuickBooks server environment, a damaged or outdated QuickBooks Database Server Manager may cause this issue.
- Hard drive issues or bad sectors can be one of the reasons for QuickBooks has stopped working.
- An incorrect file extension of QuickBooks files may also cause issues when launching QuickBooks.
- Conflicts with antivirus or firewall settings may restrict QuickBooks from running due to security restrictions.
- An outdated or incompatible Windows operating system can prevent QuickBooks from opening properly.
- Sudden power failure or system crash during operation may cause anomalies in QuickBooks program files, resulting in the issue “QuickBooks has stopped working.”
- One of the most likely reasons is insufficient permissions for QuickBooks files or folders.
- Multi-user mode issues due to network conflicts can cause problems while QuickBooks is loading.
Now that you’re equipped with the potential reasons, you’re better prepared to tackle them head-on or consult with an expert to ensure QuickBooks runs smoothly once again.

Prior Things Before Troubleshooting QuickBooks Not Responding
Before attempting any troubleshooting steps, make sure to:
- Create a backup of your company file: This will ensure that your data is safe in case of any unforeseen issues.
- Update your QuickBooks software: Ensure that you are using the latest version of the software, as it may resolve compatibility issues with Windows 11.
- Check for Windows updates: Make sure your Windows 11 operating system is up to date.
QuickBooks Not Responding or Working After Login? Here’s How to Fix It
Ever tried to open QuickBooks and it just won’t work or respond after you log in? It’s a common headache, but don’t worry, there are ways to fix it.
Most of the time, these problems happen because of the way QuickBooks talks to Windows on your computer. If you feel okay trying to fix it yourself, here are some easy steps you can follow. But remember, if you’re not sure what to do, it’s always a good idea to ask a professional or contact QuickBooks’ help team.
Easy First Steps:
- Restart Your Computer: Sometimes, just turning your computer off and on again can solve the problem. This is like giving your computer a quick rest to start fresh.
- Open QuickBooks the Secret Way: After your computer is back on, go to where your programs are listed (Start > All Programs). Find QuickBooks in the list, but instead of just clicking it, do this little trick:
- Right-click on QuickBooks.
- While holding down the ‘Ctrl’ key on your keyboard, click to open QuickBooks.
This special way of opening QuickBooks can sometimes get it working again. If it starts up smoothly, great! If not, you’re now ready to try some more detailed steps to fix the problem.
Method 1: Ensure Company File Size is Below Standard or Safe Size to Work
Why It Matters: Keeping your QuickBooks company file size within a manageable limit (typically below 1GB) is crucial for optimal performance and to prevent issues like the program not responding when opening the file.
Steps to Check Company File Size
- Open QuickBooks and go to your company file.
- Press
F2orCtrl + 1on your keyboard. This opens the Product Information window. - Look for the ‘File Size’ in the window. This shows the size of your company file.
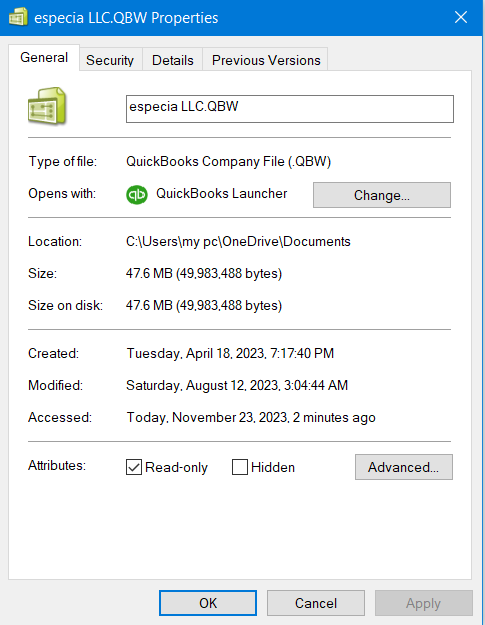
What to Do if File Size Is Above 1GB: If your company file exceeds 1GB, consider condensing or splitting the file to improve performance.
Steps to Split Company File into Two
- Backup Your Data: Before splitting, always back up your company file.
- Create a New Company File: In QuickBooks, go to the ‘File’ menu, select ‘New Company’, and follow the prompts to create a new file.
- Transfer Data: Manually transfer part of the data from the old file to the new one. This might involve re-entering transactions or using export/import features for lists.
- Verify and Rebuild Data: In both the old and new files, go to ‘File’ > ‘Utilities’ > ‘Verify Data’ and then ‘Rebuild Data’ to ensure data integrity.
Read More: How to split company file into two
Steps to Condense Company File
- Backup Your File: Always start with a backup of your company file.
- Use the Condense Feature: Go to ‘File’ > ‘Utilities‘ > ‘Condense Data’. Follow the prompts to condense your file, which can include removing old transactions while keeping summaries.
Note: Condensing or splitting company files can be complex and may have implications for your financial data. If you’re not confident in doing this, consider consulting with QB Data Service Experts.
This method should help fix the issue of QuickBooks not responding when opening a company file, especially if it’s related to the size of the company file.
Method 2: Update QuickBooks Desktop to the Latest Release
QuickBooks regularly releases updates to improve performance and fix known issues. If you’re encountering issues with your QuickBooks Desktop, updating the software to the latest release is a good first step. You can either update QuickBooks manually through the ‘Help’ menu or set a schedule for automatic updates.
Updating QuickBooks Via Help
- Open QuickBooks and navigate to the ‘Help‘ menu at the top of the interface.
- From the dropdown menu, select ‘Update QuickBooks Desktop’.
- In the ‘Update QuickBooks‘ window, go to the ‘Update Now‘ tab.
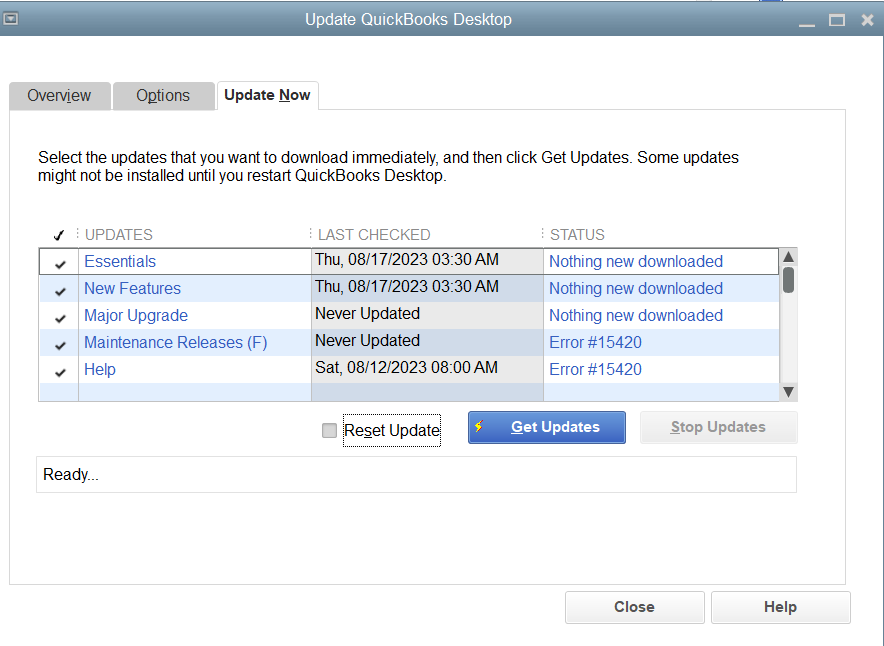
- Click ‘Get Updates’ to initiate the download process.
- Once the update is complete, close and reopen QuickBooks.
- If prompted, accept the option to install the new release.
Setting a Schedule for Updating QuickBooks
- Open QuickBooks and go to the ‘Help‘ menu.
- Select ‘Update QuickBooks Desktop‘.
- In the ‘Update QuickBooks‘ window, go to the ‘Options‘ tab.
- Choose ‘Yes‘ for the ‘Automatic Update‘ option to enable automatic updates.
- If you wish to share downloaded updates with other computers on your network, select ‘Yes‘ for ‘Share Download‘.
- Click ‘Close‘. QuickBooks will now automatically download updates whenever they are available.
Once you have updated QuickBooks, check if it has resolved your issue. If you are still experiencing difficulties, proceed to Method 2 or consider reaching out to QuickBooks support for further assistance.
Method 3: Repair or Reinstall QuickBooks Desktop
Sometimes QuickBooks Desktop may run into issues that can affect its performance, potentially leading to errors such as “QuickBooks has stopped working”. In these instances, repairing or reinstalling QuickBooks Desktop can be a viable solution. Repairing the software involves fixing issues with the existing installation, while reinstalling involves removing the current version and installing it afresh.
Steps to Repair QuickBooks Desktop on Windows 10 and 11
- Close your QuickBooks Desktop.
- Go to the Windows Start menu, search for “Control Panel” and open it.
- In the Control Panel, choose “Programs and Features” or “Uninstall a Program“.
- From the list of installed programs, find and select QuickBooks.
- Click “Uninstall/Change” then select “Repair” when the QuickBooks Installer appears.
- Click “Next” then “Repair“. Wait for the repair process to complete.
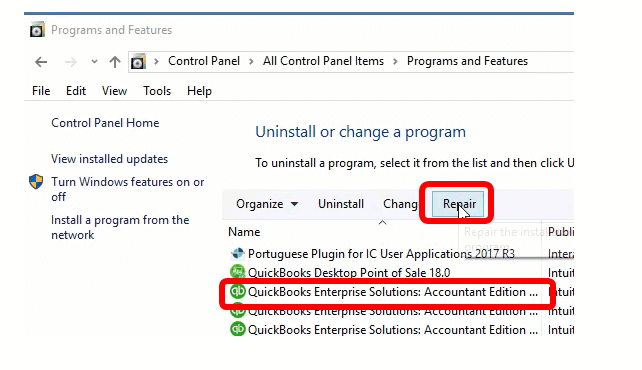
- Once completed, click “Finish“. You may need to restart your computer to fully apply the changes made during the repair.
After completing the repair process, check if QuickBooks is functioning correctly. If you’re still encountering problems, it may be necessary to completely uninstall and reinstall QuickBooks Desktop.
Important Steps Before Reinstalling QuickBooks
Before you start the reinstallation process, make sure to create a backup of your QuickBooks company file. Additionally, keep your QuickBooks Desktop download file or installation CD and license numbers handy.
Steps to Uninstall QuickBooks Desktop
- Go to the Windows Start menu, search for “Control Panel“, and open it.
- In the Control Panel, choose “Programs and Features” or “Uninstall a Program“.
- From the list of installed programs, find and select QuickBooks.
- Click “Uninstall/Change“. Follow the prompts to complete the uninstallation process.
Steps to Install QuickBooks Desktop
- Download the correct version of QuickBooks Desktop from the official website, or insert your installation CD.
- Open the file you downloaded (QuickBooks.exe) or your installation CD.
- Follow the prompts to accept the Software License Agreement, enter your Product and License numbers, and complete the installation.
If you’re still encountering issues after reinstalling QuickBooks, please reach out to QuickBooks support for further assistance.
Method 4. Run QuickBooks in Compatibility Mode
In certain situations, especially after an operating system upgrade, you might encounter issues running QuickBooks. One possible solution to address this is to run QuickBooks in Compatibility Mode. This mode allows QuickBooks to run as if it were running in an older version of Windows, which can resolve some compatibility issues.
Steps to Run QuickBooks in Compatibility Mode
- Close your QuickBooks application if it’s running.
- Go to the desktop and find the QuickBooks icon. Right-click on it and select ‘Properties‘.
- In the Properties window, go to the ‘Compatibility‘ tab.
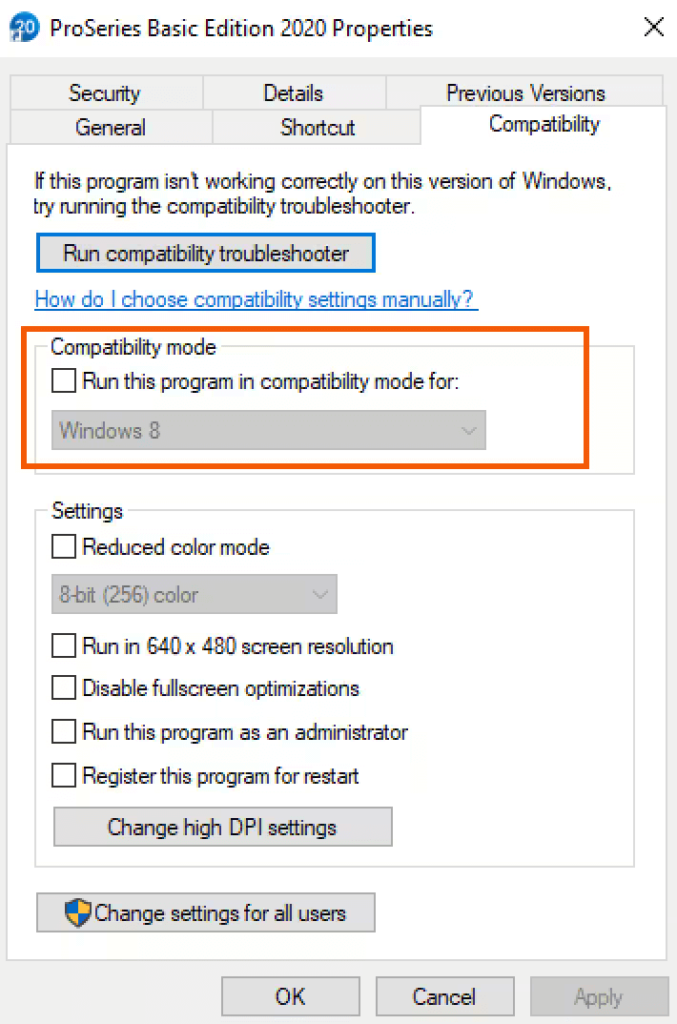
- Check the box that says ‘Run this program in compatibility mode for‘, and then select a previous version of Windows from the dropdown list. Generally, it’s recommended to start with the version of Windows you were using when QuickBooks was working without issues.
- Under ‘Settings‘, check the box for ‘Run this program as an administrator’.
- Click ‘Apply‘ and then ‘OK‘ to save your changes.
- Try launching QuickBooks again to see if it now runs without issues.
Running QuickBooks in compatibility mode is a workaround for certain issues and may not resolve all potential problems. If you’re still encountering issues after attempting this method, please consider employing Method 4.
Method 5. Disable Conflicting Programs
Think of disabling conflicting programs as clearing the road for your computer’s performance. Like fine-tuning QuickBooks, this optimization can enhance your system’s efficiency. Simply follow the steps to streamline your digital space for a smoother experience.
Steps:
- Press
Ctrl+Shift+Escto open the Task Manager.
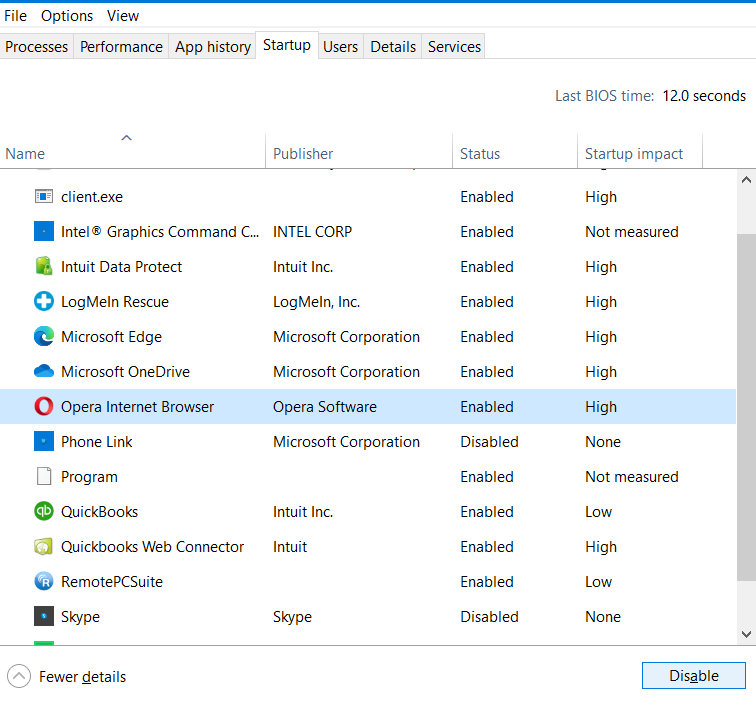
- Click on the ‘Startup’ tab and look for any programs that might interfere with QuickBooks.
- Right-click on the conflicting program and select ‘Disable’.
- Restart your computer and launch QuickBooks to see if the issue is resolved.
Method 6. Scan and Repair if HDD has bad sectors
Giving your computer a tune-up by scanning and repairing if the HDD has bad sectors is a bit like how QuickBooks can be customized to fix issues. It’s like patching up the weak spots and helping things run smoother again. Just follow the steps to scan and repair, and your computer – and QuickBooks – will be back in top shape!
Bad Sector in HDD may bring forth QuickBooks Has stopped working Windows 10 and 11.
- Press the Windows key + R and type “cmd” in the Run dialog box. Then press Enter to open the Command Prompt.
- Type “chkdsk” followed by the drive letter of the hard disk you want to scan. For example, if the drive letter is E, type “chkdsk E:” and press Enter.
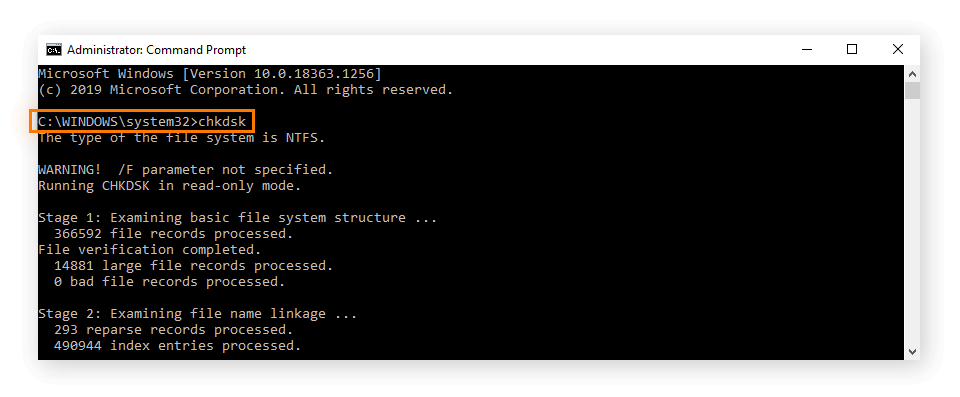
- Type “/f” to scan and fix errors automatically, or “/r” to scan and repair bad sectors. If you choose “/r”, the scanning process may take a longer time.
- If the hard disk is currently in use, type “Y” to schedule the disk check to run the next time the computer restarts.
- After scheduling the disk check or if the hard disk is not in use, type “Y” and press Enter to start the scanning and repairing process. This may take a few minutes to a few hours depending on the size of the hard disk and the number of bad sectors found.
- Once the process is complete, the Command Prompt will display the scan results. If any bad sectors were found and repaired, it will be mentioned in the results.
Note: It’s important to back up your important data before performing a scan and repair on a hard disk to avoid data loss in case of any unexpected issues.
Method 7. Customize the QBWuser.ini File
Customizing the QBWuser.ini file is like giving QuickBooks a fresh start, especially when it’s acting up or not opening right. Tweaking this file can reset your personal settings which might be causing problems. Just follow the steps to rename the qbwuser.ini file, and you’ll be on your way to fixing glitches and making QuickBooks run smoothly again.
- Before you start renaming the qbwuser.ini file, make sure that QuickBooks is closed.
- Open the folder where QuickBooks is installed on your computer. Look for the qbwuser.ini file in the same folder.
Note: If you’re not sure where QuickBooks is installed, you can use the Windows search function to locate it.
- Rename the file: Right-click on the qbwuser.ini file and select “Rename“. Change the name to qbwuser.ini.old or something similar.
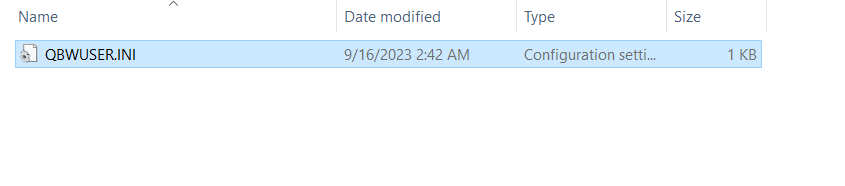
- Restart QuickBooks: After renaming the qbwuser.ini file, restart QuickBooks to create a new qbwuser.ini file with default settings.
- Check for errors: Once QuickBooks is running, check for any QuickBooks Not Responding Issue that you were experiencing before renaming the file. If the issue has been resolved, you can delete qbwuser.ini.old file.
Note: Renaming the qbwuser.ini file can reset some of your QuickBooks preferences, such as window size and location. You may need to reset these preferences after renaming the file.
Final Considerations
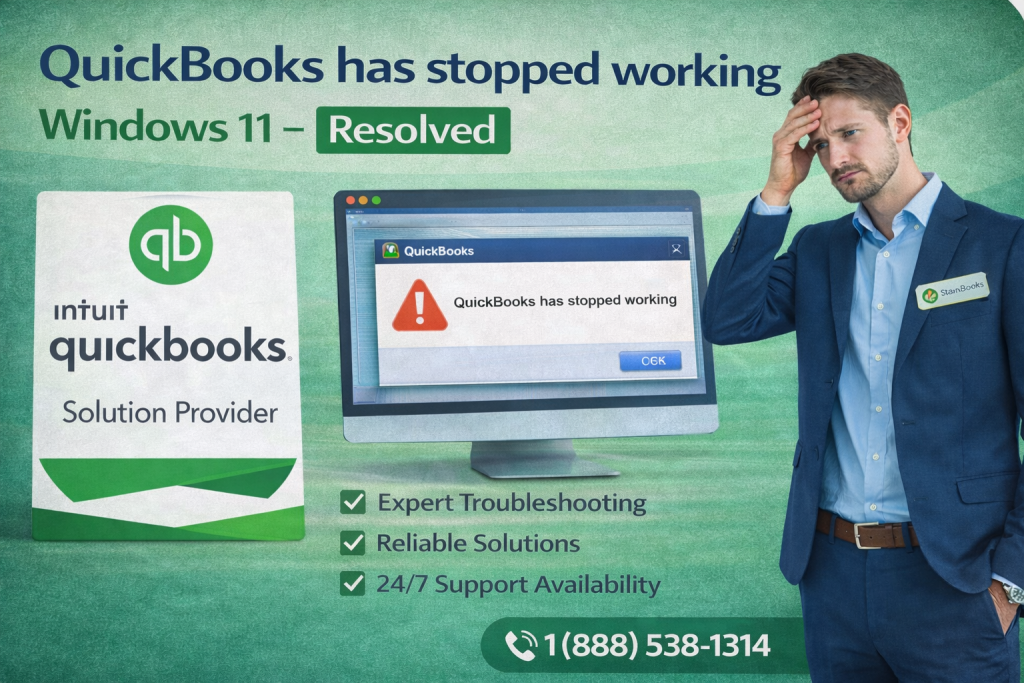
If you are still encountering problems with QuickBooks has stopped working in Windows, it is advisable to seek additional assistance from QB Data Recovery Services. Their team of experts can provide further guidance and support to help resolve the issue. For immediate assistance, you can call their toll-free helpline at 1-888-538-1314. Don’t hesitate to reach out and get the support you need to overcome the QuickBooks responsiveness issue on Windows 11.
FAQ
Q: What can I do if QuickBooks opens, but nothing is displayed on my screen?
A: If QuickBooks is not displaying correctly on Windows 11, it might be due to compatibility issues. You can try running QuickBooks in compatibility mode. Right-click on the QuickBooks icon, select ‘Properties’, go to the ‘Compatibility’ tab, check the box for ‘Run this program in compatibility mode for:’, and select a compatible Windows version from the dropdown menu. Apply the changes and reopen QuickBooks.
Q: Will updating QuickBooks to the latest version resolve this issue?
A: It is possible that updating your QuickBooks software to the latest version could resolve compatibility issues with Windows 11. It is always recommended to keep your software up to date.
Q: How do I know if a program is conflicting with QuickBooks?
A: Programs that may conflict with QuickBooks usually include antivirus software, firewalls, and other resource-intensive applications. If you suspect a program is causing issues, try temporarily disabling it to see if the problem resolves.
What Causes QuickBooks Not Working Windows 11?
QuickBooks may not work on Windows 11 due to compatibility issues with the new operating system, outdated or incompatible hardware drivers, and conflicts with other software or security settings, such as firewall or antivirus programs. To resolve the issue, check for QuickBooks updates, update hardware drivers, and review conflicting software or security settings.

I have been using QuickBooks for more than two decades, and it has always worked fine. However, after a recent update, I am unable to use QuickBooks. Each time I double-click to launch it, I see the error “QuickBooks has stopped working ucrtbase.dll.” I have already tried using the Tool Hub, but it didn’t work for me. Is there any way to fix this?
Hi Wisebookkeeping,
I understand how frustrating the error “QuickBooks has stopped working” can be, especially after an update. Since this issue occurred after updating, I recommend resetting your QuickBooks updates and trying again. Below are the steps to reset QuickBooks updates:
*Open QuickBooks Desktop.
*Go to the Help menu and select Update QuickBooks Desktop.
*Click on the Options tab.
*Select Mark All and then click Save.
*Navigate to the Update Now tab.
*Check the box for Reset Update.
*Click Get Updates to download the updates again.
*Once the updates are reset and downloaded, close and reopen QuickBooks to apply the changes.
Let me know if the issue persists after resetting the update.
First of all, thank you so much! Yes, it is working fine after resetting the updates. However, I have one more question: Should I avoid installing updates?